Tuesday, May 31, 2011

Envelope Sachets Project from Martha Stewart

Looking for an inexpensive party favor to give out at your friend's bridal shower? Better yet why not have this as one of the activities. Even if you are not hosting a bridal show this would be a great gift to make for your kids teachers for an end of the year present. If you are creating these for your kid's teachers and your kids are old enough, you may want to get them involved and help you make them.

To get started, you should read the instructions on how to make these beautiful envelope sachets from Martha Stewart's website. You can usse Martha Stewart's heart or butterfly templates, or make your own pattern. Graph paper is good for creating a grid design (such as the one shown at top left). Working on a cutting mat or piece of felt, lay your template over an envelope. If you are a crafter who makes their own cards, you may have the tools to make your own envelopes with pretty and unique papers.


Monday, May 30, 2011

Lavender Dream Soap Recipe

I would say that lavender is one of the top scents to scent bath and body products. I am not sure why that is but I bet that it is because it is a very relaxing scents. If lavender happens to be your favorite scent you may find that this cold process soap recipe called Lavender Dream Soap from David Fisher from About.com would fit the bill.

For this recipe you it will take 30 minutes to prepare your ingredients and 30 minutes to cook for a total time of 60 minutes.

The ingredients for this cold process soap recipe you will need to purchase for this recipe are 6.8 oz. palm oil, 10.2 oz. coconut oil, 1.7 oz cocoa butter, 10.2 oz. olive oil, 1.7 oz. castor oil, 3.4 oz. sunflower oil, 4.9 oz. lye, 11.3 oz. of distilled water, 2 TBS of lightly ground lavender buds, .4 oz. orange essential oil, .4 oz. patchouli essential oil and .8 oz. lavender essential oil.

The combination of orange, patchouli and lavender essential oils really sounds like a nice blend. I bet that is what the author meant by "Dream" in the title of the soap.


Sunday, May 29, 2011

The Distinction between Cocoa Butter and Refined Cocoa Butter

According to forever young on the Ulitmate Cosmetic forum:

"The definition of cocoa butter is the extraction of fatty acids from cocoa seeds. There are different categories in extracting that includes filtered, centrifuged, deodorizes through steam vacuum, degummed, bleaching, and neutralizing. The extraction of cocoa butter should not include any germ fat or shell fat that occurs in the whole cocoa beans.

These are the types of extraction of cocoa butter:

Press cocoa butter
Expeller cocoa butter
Solvent extracted cocoa butter
And refined cocoa butter

In preparation to extracting the type of cocoa butter, there are authorized treatments with analytical values that comply in every extraction. During manufacture there are specific essential composition and quality factors to be looked at to attain the resulting cocoa butter. The color, odor, and taste have designation to every type of cocoa butter produced. In every manufacture of cocoa butter there is a quality checker to look at specific identification and quality values of every butter.

In the process of extracting cocoa butter there is a specific melting point, refractive index, levels of free fatty acids, and unsaponifiables matters. According to the code of international practice of general principles of food hygiene, there must be practice of appropriate methods in extracting the butter with good manufacturing practice. It must contain no products that have objectionable matter. There must have excellent ways of sampling and examining with no amounts of microorganisms hazardous to health.

In the case of refined cocoa butter, it is manufactured through a three stage apparatus with a flow rate of 2,000 kg/hour of cocoa butter. The contents of free fatty acids are up to 5 percent in weight. It has been thoroughly processes to extract the fatty acids from the cocoa seeds. The difference between cocoa butter and unrefined cocoa butter is how they are processed well.

The different types of extracting cocoa butter from the seed itself show different treatments that result to a specific butter. When shea butter is exported to the buyers, the products are labeled with names according to how they are processed. You may not worry on how they are extracted; as long as these products will continually help your skin problems everything will be fine."

For more information on this subject, visit Solidytrade.com.

Saturday, May 28, 2011

Watermelon Body Scrub Recipe

To me, watermelons are the official symbol of summer. I love going to the local arts and wine festivals or the county fair and buying a large watermelon drink from vendor. When I saw this recipe for a Watermelon Scrub by Allison B. Kontur of Bath Body Supply I was immediately reminded me of my favorite summertime fruit. If you love watermelons as much as I do, then this body scrub would be perfect body product to make. And since Memorial Day Weekend is the unofficial start to summer, why not create this summer treat right now.

Friday, May 27, 2011

"Brewing" your own scent

Are you overwhelmed with all of the perfumes in the marketplace? Or do you find that the perfumes available give you headaches? Then you may want to consider creating your own. But you are wondering how to get started blending your own essential oils to create your own fragrances. Right? There is alot of info out there but here is a basic start to blending your own essential oils to create your own unique scent.

When making your own scents, you should always remember that perfumes have three basic structures or layers, namely: the base notes, heart or middle notes and top notes. Top notes are the first smell that you'll notice and it is also the first one to evaporate. Top notes handle the first impressions. It creates the mood and the one that immediately captivates. Meanwhile, the heart notes or otherwise known as the middle or coeur notes. These scents appear later and last longer. They give character to the perfume. The final layer is the base notes which lasts the longest. They slowly come out blending with both the heart note and the top note. Make certain that you don't put natural essential oils and absolutes as top notes. They are basically complex compounds that sometimes already contain middle notes and even top notes characteristics.

So care should be taken when you start mixing or blending different kinds of essential oils. Ideally, top notes are made from citrus oils like bergamot, lemon, mandarin, orange, etc. Conifer oils such as cypress, fir, pine, spruce, etc. can also be used. Also popular top notes oils include mint oils, cardamom, basil, chamomile, juniperberry, ginger, petitgrain and rosemary. When it comes to middle notes, probably the best oils to use are floral oils and absolutes such as caraway, black pepper, cinnamon, clary sage and clove bud.

Oils from elemi, coriander, galbanum, sweet marjoram, geranium, lavender and nutmeg are also great middle note materials. Palmarosa, thyme and violet leaf absolute have also been used before and their blending capabilities have proved to be quite effective. Wood oils like cedarwood, gaiac, linaloe wood and sandalwood are great as base notes. So are resin oils like frankincense and myrrh. Perfumers also use labdanum, patchouli, oakmoss absolute, vetiver and even vanilla as base notes for their perfumes.

When making your own perfumes, it is always, always important to know your materials. Essential oils for example have different characters, behavior, strength and weaknesses. Each characteristic should be considered and their effects studied closely. You need to know the effects of the essential oils and perfume blends on your skin. You need how to understand how the mixture will react when diluted or when it is set over time. You need to be prepared and know or at least have an idea on how the mixtures will react. It is, therefore, perfect advice that you write down all the processes that you undertook, from measurements to blending procedures. And as important as the actual steps are, one needs to take regular breaks. Not only will this help in raising creativity but it will help make you safe from some harmful effects of prolong exposure from oils.

Remember that you are working with essential oils. These oils are highly concentrated and give off very strong smell. It is, therefore, possible to become sick if you spent too much time working on them especially in unventilated areas. And also, there's also a limit to how much scent or perfume your nose can take.

Thursday, May 26, 2011

How to Make Scented Bath Melts

When I was young I remember those Calgon commercials that would have the ladies saying "Calgon take me away!". If you feel like to you to take a break from your hectic life, why not take a long bath and use these lovely scented bath melts? Are you wondering what bath melts are? According to tabbycatfight, ehow contributer, bath melts, which melt in warm water - turn your bath into a luxurious, skin softening treat! They are sold at bath & body specialty stores - but it is easy to make your own for a fraction of the cost.

Making bath melts are relatively easy. Want to learn how to make them for your next bath? Here is the full recipe and instructions on How to Make Scented Bath Melts. Now the author of this recipe includes 2 cups of cocoa butter or shea butter and does not indicate whether or not to use refined or unrefined. You are wondering what that means. Well, if you purchase a unrefined product that is refined and deodorized that is processed and the original scent of the product will be removed. Cocoa butter has a chocolate aroma, whereas the shea butter has a nutty aroma. If are concerned that those aroma is going interfere with the fragrance you will be adding then go with the refined & deodorized. But if you are selecting a scent such a vanilla, peppermint or coconut which works well with a chocolate scent then select the unrefined version.

Wednesday, May 25, 2011

Cooling Pedi-Spray Recipe

The days are getting warmer, how would you like to cool down your feet? This Cooling Foot Spray Recipe by Allison B. Kontur of Bath Body Supply tells you how to make this fantastic foot spray. You will need to purchase the following supplies: 1 oz Distilled Water, 5 ml Aloe Vera Powder - 200X, 3 oz Liquid Perfume Base, and 5 ml Peppermint Essential Oil. You many not find aloe vera powder and liquid perfume base very easily so you may want to purchase these items through Bath Body Supply since this recipe originally appears through them.

Tuesday, May 24, 2011

Mosquito Soap Recipe

During the summer do you live in an area where you get alot of mosquioto bites? Or do you going camping each summer and hates those pesky bites? MakingBathProducts.com recently posted a cold process soap recipe for Mosquito Soap. According to MakingBathProducts.com, there are many essential oils that fight off mosquitoes and ticks. Citronella is the most widely known and the most recognizable when it comes to the scent. Mixing citronella with other oils that have similar properties create an effective bug-fighting soap with a more appealing fragrance.

Monday, May 23, 2011

Body Butter Recipe by Joan Morais

Love body butters? Would like to create your own? Then check out this by Joan Morais easy and superb body butter to make.

This recipe makes approximately 12 ounces. You will need the following ingredients to create this recipe:

3/4 cup cocoa butter
3/4 cup shea butter
5 oz almond oil
8 drops vit E oil (optional)
1/2 teaspoon or 50 drops essential oil-try lavender or peppermint (optional)

Warm up double boiler, melt shea butter.Add cocoa butter, melt. Add almond oil, stir. Remove from heat. Add Vitamin E oil and essential oil when cooled or before whipping. Pour into a bowl (metal is best). Set bowl with mixture into a bowl with cold water and put in freezer for 15-30 minutes or until cloudy on top. Take out of freezer. Whip for about 4 minutes until a frosting consistency. Spoon into containers. Label.

According to Joan, you can substitute other oils and butters for the ones listed. If you like to see a demonstration of this product being made, check outh this video clip of Joan herself demonstrating the making of this project: http://cbs13.com/vide/?id=15908@kovr.dayport.com

If you are interested in learning more about Joan, please check out her website (http://www.joanmorais.com/). She does teach classes and sells her ebooks in the following topics: cold process soap making, lotion making, Body Butters: Whipped & Lotion Bars, candle making, and more.

Sunday, May 22, 2011

Cracked Heels Problems?

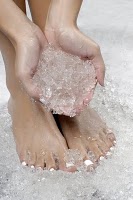
Do you have cracked heals and you are wondering why? I found this article on Beauty Feast.com (unforunately the link is broken) which really gives insight to this problem. According to Beauty Feast, "Cracked heels are a problem of fissuring and thickening of the foot’s skin. Cracked heels are the main problem of foot. The skin of the foot may bleed and cause severe pain in case of deep fissures.

The alternative name of cracked heels is fissures. The colors of skin of the foot are also change in dark brown or yellow with cracked heels. In some cases, cracked heels are developed by the deficiency of moisturizer and over exposure.

Causes of Cracked Heels:
Dry skin
Obesity
Surgery to the lower extremities
Mal-aligment of the metatarsal bones
High arched feet
Athlete’s feet
Sweat glands
Prolonged standing
Wearing tight shoes
Heel spurs
Flat feet
Shoes do not wear properly
Thyroid disease
Psoriasis
Diabetes
Signs and symptoms of cracked heels:
Dark or yellow skin of the foot
Severe pain in open back shoes or thin soles
Cracked and peeling skin
Hard skin on the heel of foot
Experience pain during walking barefoot
Itchy skin
Flaky or red patches on the foot’s skin
Internal and external factors for cracked heels
Internal factors
Dry scaly skin because of other health problems or climate
Due to ageing, thick and dry skin of foot with loss of elasticity
Calcaneal spurs, flat foot and others injuries or congenital problems
Deficiency of minerals, zinc and vitamins
External factors
Standing for long term period
Heat during summer
Changes in the posture of walking
Unhygienic conditions or circumstances

Treatment for cracked heels
Use a pumice stone for reducing the hard and dry skin from the heels
Apply a moisturizing cream on the affected area
Do not wear thin soled shoes or open backed shoes
One should wear shoes with a good shock absorbing sole
Before going to the bed at night, apple foot care cream to reduce the dry skin and cracked heels.
As the excess moisture can cause bacterial infections like athlete’s foot, so make sure about the avoiding foot balm, foot cream and foot lotion.

Prevention
Wear comfortable, soft and cushioned slippers or shoes
Apply essential oils on the dry skin of foot
Always keep soles of foot clean
For preventing friction, wear cotton socks
Take vitamins, minerals and zinc in diet such as fresh leafy green vegetables, fruits, dates etc.
People who are suffered from cracked heels, should avoid the following:
Tight shoes
Direct contact of chemical such as bleaching powder
Walking bare foot
In water, standing for long term period
Using soaps that contain harmful chemicals

I hope this information helps you to combat this problem since sandle wearing is now approaching. For me I suffered this problem on my right foot. And I believed that I favor my right side ever since I broke my left knee back in 1997. But ever since I learned how to make my own body balm I have used this product on my foot on a regular basis that I do not have this problem anymore.

Saturday, May 21, 2011

Solid Perfume Tutorial

I follow a blog titled Totally Tutorials which offers alot of different tutorials on a variety of different crafts. This time they shared a tutorial from Bloom, Bake and Create on how to make your own solid perfume. This is a simple recipe and can be easily printout for your convenience.

Friday, May 20, 2011

How To Make Your Own Custom Silicone Soap Molds Tutorial

I find that some of the inexpensive plastic melt and pour molds that you can purchase from your local craft store do not last very long. After awhile I started to collect different shapes of the silicone muffin pans from Wilton and other manufacturers. I was wondering how I could create my own. Well, I found a class that I took at The Nova Studio which was very informative. And I started to look for more information on the internet on the subject. I found this tutorial titled, How To Make Your Own Custom Silicone Soap Molds by Kaseen Cook of Toruga Soaps. This tutorial appears on SMF (Soap Making Forum) Tutorials Page which has also includes other great tutorials on other soapmaking, candle and other bath and body products you can help you make your own products in your own home.


Thursday, May 19, 2011

Cafe Latte Body Scrub Bar

Need that jolt of caffeine in the morning to get your motor running? Instead of drinking coffee how about starting your day with this Cafe Latte Body Scrub Bar?

This recipe from Do it Yourself Skincare (aka Bath and Body Supply) is easy to make and it only take a few ingredients which include Mango Butter, Shea Butter, Fine Dead Sea Salt, Baking Soda, Organic Ground Coffee, Polysorbate 20, Cafe Latte Fragrance Oil. If you do not have these ingredients you can purchase them from your favorite online supplier or better yet Bath Body Supply.

Wednesday, May 18, 2011

Learn How To Use Emulsifying Wax

Emulifying wax is often found most commonly found in recipes when you have to combine water and oil which are your lotions and creams. If you have been wondering about how to use emulisifying wax but you were afraid to ask, I found this article which appears on the website MakingBathProducts.com that just may answer all of your questions.

Tuesday, May 17, 2011

How To Photograph Your Soaps Tutorial

Are you currently selling your soaps online and the pictures of your beautiful work is not coming out the way you like? Or are you considering selling your soap online and you are wondering what is the best way to take pictures of your soap in order to be best representive of your work? I have found an article by Aleksandra (Soapmakingforum member) on the SMF Tutorial Page titled How To Photograph Your Soaps Tutorial. If you are not a professional photographer, this article will give you simple tips and tricks on how to improve your picture taking.

Monday, May 16, 2011

Melting Point, Pour Point, Flash Point

by Shanda Lynn Markham, BellaOnline's Candlemaking Editor

Measurements are a key component in candle making. For the candle maker wanting to pursue selling their candles it is critical. To sell candles, you must be able to re-create the formula and if you have not measured or written down everything, how can you duplicate it? Although I like some forms of math, this kind just gives me headaches! It is my least favorite aspect of candle making.

Weight vs. volume is one of the first things to focus on. To refresh our memories weight is the actual volume of the product and volume is how much space it takes up. With that being said, can you see why it is important? Fragrance oils have different densities. For example, 1 oz. of patchouli may look less in a container compared to 1oz. of strawberry, but in reality they weight the same, one is just denser than the other. For this reason, weight is the more accurate measure in candle making. If you use 1 oz. by volume of a denser fragrant it is going to affect your final product. It could be too much and cause the candle to sweat. I always recommend weighing all LIQUID ingredients by weight.

On the other hand, this reasoning does not hold true with “dry” ingredients. For example, 1 tsp. of Vybar 260 weighs only 1/10 of an oz., not 1/6 of an ounce. (Water is used to determine how much 1 tsp. weighs). So if you went by weight on it, you would in reality be using too much Vybar. Confused yet? It is important to remember that the common weight ratios are measured using water. Some ingredients are going to be lighter than water and others heavier. 1 lb. of wax is equivalent to 20 oz. when melted, not 16 oz. I know it can be too confusing so I am going to go over some common measurements and how to change your ratios.

1 lb. = 16 oz. = 454 g = 454 ml = 32 Tbsp. (by volume) = 96 tsp. (by volume)
1 oz. = 28.4 g = 2 Tbsp. (by volume) = 16 tsp. (by volume)
1 cup (by volume) = 8 oz. (by volume) = ½ lb. (by volume) = 48 tsp. (by volume) = 6 Tbsp. (by volume)
1 tsp. (by volume) = 1/6 oz. (by volume) = 1/3 Tbsp. (by volume) = ~4.7g = 4.7 ml
1 Tbsp. (by volume) = 3 tsp. (by volume) = ~ ½ oz. = ~14 g = 14 ml
1 lb. of beeswax = 16 volume ounces
1 lb. of soy wax = 18 volume ounces
1 lb. of paraffin wax = 20 volume ounces

One of the ways I try to look at this is if it fits in a measuring cup/spoon it is a volume weight. Weight to volume conversion cannot be used with dry materials accurately.

So now we have a semblance of understanding about measuring our materials. We’ve been given a recipe going by pound, how would we convert it? My recipe calls for 1 lb. of wax, 1 tsp. of Vybar, and 1 oz. of scent. Now I want to make 10 lbs. of this formula. I simply multiply each by 10 to get 10 lbs. of wax, 10 tsp. of Vybar (or 3 Tbsp. plus 1 tsp.), and 10 oz. of scent. I will only use measuring spoons on my Vybar and will weight my wax and scent.

Now we’ve been given a recipe using percentages. The key to this is that all percentages of ingredients used must total 100%. For example, I have a recipe calling for 90% paraffin, 1% Vybar, and 9% scent. These percentages do total 100% and would make 100 lbs. of mix. But what if I only wanted to make 10 lbs.? I would take each component and divide by 10 and get 9 lbs. of paraffin, 1/10 of a lb. of Vybar and 1/10 percent of scent. Looking at my above list, 1/10 of a lb. of Vybar would be equivalent to 9.6 tsp. of Vybar and 1.6 oz. of scent.

Believe it or not, some recipes use proportions, parts. It may call for 90 parts wax, 1 part Vybar, and 6 parts scent for a total of 97 parts. The parts can represent whatever measurement you are using. Usually you are using pounds of wax, not ounces so thinking in terms of pounds would be best. But what if I only wanted to use 10 lbs. of wax? I would divide my 97 by 10 giving me 9.7. I then would divide the other “parts” by 9.7. Since it would all be represented by pounds I would have to use my conversion to find ounces and teaspoons. If I wanted to increase I would still divide my overall parts by the amount I wanted to use, but I would then multiply the other parts by that result instead of divide. Proportions can be very challenging, but you can easily convert them to percentages. Simply take your total parts and divide by actual parts which would be 97/90 and then multiply by 100. Likewise, the Vybar would be 97/1 multiplied by 100.

To find how much wax to use for your project, fill the container you are using with water and weigh for ounces. Multiply this answer by how many containers you are filling and then divide by 20. For example, I am making 10 2 oz. votives, which gives me 20 total ounces divided by 20 (how many ounces by volume are in 1 lb. of wax) giving me 1. I would then know to use 1 lb. of wax for this project. That is the super simple formula. If you are adding fragrance oils and additives you will need to remember to allow for those.

Permission to reprint by Shanda Lynn Markham, BellaOnline's Candlemaking Editor.
Original article - http://www.bellaonline.com/articles/art60372.asp

Sunday, May 15, 2011

Homemade Lemon Body Scrub Recipe

If you like lemons you may want to try this Homemade Body Scrub which appears in the March 2011 issue of Martha Stewart Living. The ingredients you need for this recipe are Burt's Bees Body Oil; Epsom salt, sea salt, or organic cane sugar; lemon zest and a 12 oz pet plastic jar.

There are two items that I find really interesting about this recipe. The first thing is the Burt's Bees Body Oil. According to the website, the body oil nourishes your skin combines energizing Lemon Oil to refresh and Vitamin E and Sweet Almond Oil to soothe and moisturize, leaving you with soft, supple, beautiful skin, naturally. The product is 100% natural and contains the following ingredients: prunus amygdalus dulcis (sweet almond) oil, citrus medica limonum (lemon) oil, triticum vulgare (wheat) germ oil, tocopherol, rosmarinus officinalis (rosemary) leaf extract, glycine soja (soybean) oil, canola oil. If you prefer not to use a combination of canola, wheat germ oil and almond oil, you can probably select one of these oils individually instead. And if you like to have the lemon aroma, then you can add lemon essential to your oil. Plus you may want to vitamin E (tocopherol) and rosemary leaf extract to assist with slowing down the rancidity of the oil.

Second of all is the lemon zest. Since this is a fresh item, you may want watch your creation to make sure that it does not go moldy. If you are afraid that it will, you can omit it and just replace it with lemon essential oil. Just a reminder that lemon essential oil is photosensitive which means that it could cause rashes or sunburn if you go immediately out in the daylight. If you have to go out immediately then make sure to cover up.

Saturday, May 14, 2011

How to Make Scented Fabric Softener & Dryer Sheets

This is the second part of series on how to make your own laundry from The Natural Beauty Workshop which is dedicated to making your own scented dryer sheets and fabric softener. I have never made either of these two items but I do purchase these items from my local store. Now the author of this tutorial says that making your own fabric softener and dryer sheets is made easy and cost effective by using ingredients and materials readily found in most households. Looking over the ingredients and instructions it seems very easy but I am skeptical about white vinegar being the main ingredient for the fabric softener. I am wondering how distilled white vinegar actually softens. I guess I will have to try it and see how it works. If it does work then I will scrap my brand and switch. And if it is a major sucess, then I will be adding these recipes to my eco-friendly housecleaning products file.

Friday, May 13, 2011

Lipstick Tutorial From The Soap King

Even though this lipstick recipe was specified by The Soap King for Mother's Day...I am sure you can make anytime or for any occasion like for a party favor at your next bridal shower. Or about about doing it for an activity during your party? The only thing I would not do is send to someone across the country during the summer. I would hate to see them receive a melted mess. Anyway, it looks like it is very similiar to making your own lip balm recipe.

Thursday, May 12, 2011

How to Make Scented Rock Potpourri

Want to scent your room in an unusal way? Then why not create these unique scented rock potpourri? This is a very interested recipe by Tielle Webb, eHow Contributing Writer and would add a different texture to any room. So take a look on How to Make Scented Rock Potpourri.

What I find interesting about this recipe is the use of rocks for this particular project. Most of the recipes I have seen have used a course rock salt as the primary ingredient. Plus the use of shiny rocks used in the photo seems odd to me. I am sure to those of you who have made something similiar have found better recipes. If you have found a better recipe, please share them with us. Would like her your opinions and suggestions on this subject.

Wednesday, May 11, 2011

How To Make An Upright Soap Swirl Tutorial

Awhile back I posted a tutorial from Brambleberry on how to make a vertical layered cold process soap. While searching on the internet I found this tutorial on How To Make An Upright Soap Swirl Soap on the website SMF Tutorials. So take your cold process soap to the next level and try making a swirl soap in the upright position. Good Luck!

Tuesday, May 10, 2011

Raspberry Sugar Scrub Recipe

If you love sugar scrubs and raspberries, here is a recipe that combines the two. This Raspberry Sugar Scrub recipe from MakingBathProducts.com has two options in scenting your scrub with the addition of the exfoliating properties of the sugar, dried cranberry seeds and raspberry seeds. If you like oatmeal in your body products, then you would like this recipe too. The author did not forget all of you oatmeal lovers.

Monday, May 9, 2011

Wash Your Mouth Out With Strawberry Pie

If you were one of those unlucky ones like me who missed the Soap Intensive Weekend at Otion last year (2010), here’s an exclusive peek at one of the creative projects that was taught by Erin Pikor of Naiad Soap Arts - Summer Strawberry Pie! This would be an adorable favor to give out at this year's family reunion picnic or for a summer bridal or baby shower. If you are watching your weight - this would be perfect summer time treat without the calories.

Sunday, May 8, 2011

Aromatherapy During Pregnancy

If you are wondering about using essential oils for aromatherapy during pregnancy, here is a good article to start with. Of course, it is best to consult a practioner with experience before preceeding with any essential oils.

The most common essential oils that should not be used during pregrancy are basil, cinnamon, aniseed, fennel, juniper, thyme (red and linaol), clary sage, oregano, clove, bay, nutmeg, pimento, berry, cistus, hops, sage, valerian, spikenard, black pepper, tarragon, cedarwood, hydsop, myrrh, peppermint, mace, cumin, parsely seed, wintergreen and birch.

Here are some articles written on the subject - http://www.essentials-of-aromatherapy.com/aromatherapy_during_pregnancy.html

If anyone out there that has more information to share about this subject, I would appreciate hearing from you from websites to articles.

Saturday, May 7, 2011

Layered Lotion Bar Love

Do you love lotions sticks? Well, I happened to find this Layered Lotion Bar Love tutorial on The Soap Queen's Blog - Soap and the Finer Things in Life.

According to the instructions the recipe makes 10-14 tubes of lotion sticks, but the instructions do not say what size the push up tubes are. It is hard to say actually what the true size of the tubes are but my estimate may be 1-2 oz. Even though the recipe calls for the Summer Fling Fragrance Oil, you can be daring and find a different fragrance to your liking. But I have a feeling that the fragrance oil that was selected somehow corresponded to the colors of the end product. Remember you can purchase all supplies through Brambleberry.

These would be a cute gift to give someone who has never tried a lotion stick. I think this would be adorable to receive. I happened to be attracted to the beautiful pastel colors.

Friday, May 6, 2011

Teacup Candelabra Project

If you love teacups as much as I do, then you may want to create this really cute Teacup Candelabra. This project comes from Season 4 of the Katie Brown Workshop .

I really like this project because I love the shabby chic look and as soon as I find a candelabra and I am going to make this project immediately to go with my decor.


Definately this would be a really cute presentation to adorn your table for a bridal or baby shower or even a tea party at your home.

Thursday, May 5, 2011

Funnel Swirl/Coat Hanger Swirl Soap Tutorial

If you love the look of the Funnel Swirl Soap, Lovin' Soap has provided a wonderful step by step tutorial on how to make a Funnel/Coat Hanger Swirl Soap of your very own. If you have made funnel swirl soap in the past, you may want to try this technique for size.

Wednesday, May 4, 2011

Layered Melt and Pour Soap Projects

Love melt and pour soap making and are wondering how to make the wonderful layered soaps? Here is soap project from SoapPlace.com - Layered Soap Bars which will make the process alot easier for you. I have to be honest -I really like the combonation of opaque and clear layers. I will have to give this a try! My high school colors were orange, white and black. So I am thinking of making a orange creamsicle with a white opaque layer between two orange layers. Of course, I will have to scent orange. Or how about orange and vanilla? What do you think?

Tuesday, May 3, 2011

How to Recycle Candle Wax

Ever have that chunk of wax left over from a pillar candle or have a candle which has a wick too short for burning? Here are some steps from amymcclair, eHow User to help you use that wax without wasting it. To read more about how to get started on how to do this, then check out this article How to Recycle Candle Wax. If you are having trouble removing wax from a container, you may want to check out this article on ehow on How to Remove Candle Wax from a Container. Let's forget about throwing out those candles and start recycling!

Monday, May 2, 2011

Loofah Cold Process Soap Tutorial

I have seen loofah in melt and pour soap but I have never seen it in a cold process bar before. If like the idea of having loofah in your soap to exfoliate your skin while you are taking a shower but you find it to be too scratchy? Anne-Marie (aka The Soap Queen) developed this loofah cold process soap recipe with a mild scrub in mind. This recipe is great because it has a nice gentle scrub on one side of the soap and it's silky smooth on the other.

Sunday, May 1, 2011

Soapylove tutorial: Rainbow Carnations!

Carnations happen to be one of my favorite flowers. The reason why they seem to last alot longer than most other flowers in the arrangments I have received in my life. So I found this interesting Soapy Love Tutorial on The Soap Queens's website. Since Mother's Day is just around the corner, why not create this special Rainbow Carnation bouquet for your Mother!