Love is in the air? Especially more around this time because Valentine's Day! Besides red roses, chocolate is the other important componet to this very romantic day. Instead of giving a box of candy to your sweetie, how about creating some dedicant chocolate body products? In a recent article on The Mountain Rose Blog titled Love Inspired Cacaco Recipes, Irene shares her delicious sounding body products which include Cacao and Vanilla Body Polish, Creamy Cocoa and Ylang-Ylandg Massage Oil, and Sweet Orange and Cocoa Lip Balm. In addition she provides a simple hot chocolate recipe which is to whip up a decadent cup of hot chocolate at home with just a few ingredients.
If chocolate is not your cup of tea, but you still want to create some fabulous body products to give for Valentine's Day, Irene suggests checking out The Mountain Rose article, Love Inspired Body Care Recipes. Or if you are creatively challenged, the check the article, Herbal Gifts to Love.
Tuesday, January 31, 2012
Monday, January 30, 2012
Shredded Cold Processed Soap Log

Sunday, January 29, 2012
Creamy Coco Oats Bath
If you have ever wished that you could bathe in cream, then you are going to love this milk bath. This Creamy Coco Oats Bath Tea from Free Bath Recipes is easy recipe to create for your next relaxing bath. Using a combination of skin loving ingredients, your skin will scream for more as you bathe. The i ngredients you will need are 1 Cup Plain Oatmeal, 1 Cup Powdered Milk, 1/4 Cup Powdered Coconut Milk, 1 Teaspoon Honey Powder, 1 Tablespoon Vanilla FO, and 1 Tablespoon Coconut FO. The instructions are very simple: Combine all ingredients in a bowl, mixing well. Add 1 cup of milk bath to a tub full of warm water. Do not add to cold water or the ingredients will not dissolve well.
Saturday, January 28, 2012
Green Tea Rebatch (Teabatch?)
 Rebatch soap is another way of making soap. It is taking a previous bar of soap (usually a cold process bar) and shredding it then processing (usually melting it in a double boiler over the stove) to create it into a new bar of soap. If making soap by the rebatch method is your speciality or if you would like to try and make a batch, you may want to check out this tutorial that appears on the blog Soap and the Finer Things in Life called Green Tea Rebatch Soap. I have never made a bar of rebatch soap but would like to try it some day. For those who have made soap by this process, what are your thoughts?
Friday, January 27, 2012
Lotion Bar Love
 Anne Marie (aka The Soap Queen) had so many requests for a lotion bar tutorial that she went into the lab and created this colorful multi-layered lotion stick creation. This Lotion Bar Love recipe is extremely easy that it takes only 30 minutes to make and will give you 1o-14 lotion sticks to give out as gifts to friends and family for any occassion. I really loved the pastel layered look. It reminds me of a freshing sherbet.
Thursday, January 26, 2012
Valentine Sugar Cookies (M&P Soaps)
 Valentine's Day is coming up fast. Instead of giving the ordinary flowers and candy, how about making these adorable Valentine Sugar Cookies from Wholesale Supplies Plus? These melt and pour soaps smell like a sugar cookie with strawberry filling. Sounds yummy to me which will definately save on the calories. Thanks to Wholesale Supplies Plus for this one and making it convenient to easy print out this recipe for our libraries!
Wednesday, January 25, 2012
Recycled Candles - Making Votives and Tea Lights
 Do you enjoy burning candles? And you are wondering what to do with the unsightly candle stubs? Well, I have the answer and solution to your problem - recycle the wax and make votives and tea lights. Wondering how to do it? In the article Recycled Candles - Making Votives and Tea Lights by Erica, owner of The Bonnie Bath Company tells you how.
Tuesday, January 24, 2012
Bath Tea Recipe for Those Who Have Varicose Veins

DeShawn prefers using fresh ingredients to the dried, but if you only have the dried it works just fine. She puts all the fine ingredients in to a muslin bag and put in to the bath, but like sthe fresh lemon and ginger to float in the bath rather than putting it in to a bag. This is just my own personal preference, but you can do it any way you like to.
So try this bath tea recipe and let her know what you think.
Monday, January 23, 2012
Making Loofah Soap
There are body scrubs made with sugar or salt to exfoliate the skin when you are in the shower. Or how about making your own exfoliating bar of soap? Want to learn how? Learn how to make a loofah glycerin soap by the melt and pour method by watching this video from The Soap Queen on Vimeo.
Making Loofah Soap from Soap Queen on Vimeo.
Sunday, January 22, 2012
Mint Twist Exfoliating Lip Scrub
 This Mint Twist Exfoliating Lip Scrub recipe from The Natural Workshop is pretty quick and would be a great addition to a facial, a spa party, or a unique lip care line. The cooling, creamy Shealoe gives your lips something to smile about while gentle Jojoba Wax Beads and Organic Sugar Grains scrub away dry flakes. The delicious aroma of Peppermint and Lime is just an added bonus. Make sure to read the section on how to package your lip scrub, it may inspire you to be creative.
Saturday, January 21, 2012
Using 3D Latex Molds
Latex molds can be fun and economical way to create detailed soaps, beeswax figurines and candles. But you are wondering how to keep the mold stable since there is no flat side to keep the mold up while you pour your mixture into the mold. According to Glory Bee Foods, there is a simple way to keep your mold stable. Just follow these instructions and you should have success:
(1) Trace the open end of your mold on a thick piece of cardboard.
(2) Cut shape. Cut 1/8" inside the line that you traced which will create a smaller mold than the mold rim. This is to insure that your mold will fit snuggly and will not fall over spilling any of your contents.
(3) Insert mold into cut out. Lip of mold should be supported by cardboard cut out.
(4) Place in a container deeper than your mold byt not wider than the cardboard.
(5) Fill mold.
(6) Let cool until completely harden.
(7) Peel mold from cast by rolling mold down casting.
I have never used these type of molds myself for candle or soap making, so if anyone has any suggestions to add, please share them with us.
Friday, January 20, 2012
Valentine Whoopie Pies (Melt & Pour Soap)
 While checking on the blogs I follow, I found this really cute idea from Wholesale Supplies Plus on how to make Whoopie Soaps for Valentine's Day. These soaps will make cute gifts for Valentine's Day or if you make soaps to sell they would be a big hit at your craft show or on your website. This is an intermediate project that makes approximately (24) 1.5 oz bars. These are so cute that I will have to try and make them myself.
Thursday, January 19, 2012
How to Label Lotion
 In this final installment of her labelling series, Anne Marie (aka The Soap Queen) has posted to her blog Soap and The Finer Things in Life her article on How to Label Lotion. In this article, Anne Marie how labelling your lotion is way different than labelling your lip balm or soap. She even discusses warning labels. But that is not all! She also shares a lotion recipe which was originally posted in 2008.
Wednesday, January 18, 2012
Bath Butter Scrub Recipe
 This bath butter scrub recipe is cleverly named Olive Asian Tapenade by Denise from Go Planet Earth. Denise was getting together with some gal pals one Christmas for their annual Holiday Soap Night and this was one of the projects made so that they can give the gift of pampering. Just to let you know that the recipe calls for 16 oz of bath butter which is premade and can be ordered through Go Planet Earth. This base provides a great world of possibilities. Whip it into a soap parfait, color and layer, use as a base, a shaving butter or foam, a base for a sugar or salt scrub. Body butter is a luxurious, creamy cleansing product with the consistency of butter and can be used as a moisturizing body cleanser or a shaving cream. It is paraben free and propylene glycol free!
Tuesday, January 17, 2012
Shaped Soaps for Valentine's Day
 How would you like to create these adorable soap shapes to place in your melt and pour soap? Denise from Go Planet Earth created this Valentine's Day Soap tutorial so that you can place these shapes will later be embeded and layered into a heart shaped mold. Shaped cutters are used to make them. Once these shapes were created, Denise took these soap embedds and arranged these shapes in a larger bar of soap. Once the soap is hardened you can use really cute packaging to place them in and give them as gifts. How about giving these out to your child's class for their Valentine's party at school.
Monday, January 16, 2012
Column Swirl Soap
 This column swirl soap pattern reminds me of this fabric pattern from the 80's. How would like to recreate this pattern in your bars of cold process soap? This columun swirl soap tutorial appears in two parts on the Lovin' Soap website. Both Part one and Part two of the tutorial has all of the photos on how to recreate this soap. If you would like to see a video on how to create this particular soap, check on this swirl soap video tutorial which appears on Soapy Love's Facebook page.
The ingredients you need for this particular cold process project are 12 oz coconut, 8 oz olive, 7 oz palm, 2 oz jojoba, 1 oz castor.
Sunday, January 15, 2012
How to Make Striped Beeswax Candles
Rolling candles from thin sheets of colored beeswax is a relatively easy and inexpensive way to make your own customized candles. Pillars are the easiest to make this way. Tapers take a little more skill but have a great look. Making striped tapers is even a little more challenging, but once you try it a few times, it shouldn't be hard to master the technique. So, if you would like to take your rolled beeswax candles to the level, then you may want to try to make these Stripe Beeswax Candles by ehow contributor, Sarah Rigg.
Saturday, January 14, 2012
Ocean Breeze Bath Bombs Recipe
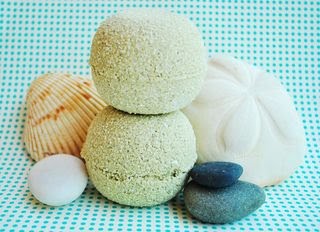 These fresh scented Ocean Breeze Bath Bombs from The Natural Beauty Workshop are inspired by the crisp, refreshing feeling of sea water. Drop one in the tub, close your eyes, and imagine yourself on a sandy beach somewhere beautiful. Sea Salt, Kelp Powder and Coral Calcium add the ocean's skin care benefits to the recipe, while Parsley Powder provides a touch of color. These bombs are scented with a bright blend of citrus, mint, and juniper, making them a great pick-me-up. This recipes makes about 17 ounces of bath bomb mixture, which is enough for two large, or four small bath bombs.
Friday, January 13, 2012
Labeling Your Products : Lip Balm
 Once you have completed your lip balm project and are wondering how to label each tube? May I suggest reading the article, Labeling Your Products : Lip Balm by The Soap Queen herself, Anne-Marie. In this post, Anne-Marie will be touching the tip of the iceberg on this important subject.
Thursday, January 12, 2012
Bath Fizzy Recipe from Otion
 Christmas and New Years is now over and the next holiday to come up is Valentine's Day. Here are two recipes for bath fizzies that appears on The Soap Queen's blog in January 2009.
The supplies you will need to make these heart shaped bath fizzies are: Citric Acid, Baking Soda, Witch Hazel, Fragrance (Baby Rose, Rosehip Jasmine or English Rose), Simple Heart Mold and
Rose Petals. If you want to make the Chocolate Bath Fizzies are very similiar to the previous recipe but you will need the additional ingredients; Grated Milk Chocolate & Cocoa Butter and Fragrance (Turkish Mocha, Dark Rich Chocolate, Chocolate Espresso).
Once completed you can find some really cute packaging at your local craft stores ie cellophane bags and take out containers to complete the gift giving experience.
Wednesday, January 11, 2012
How to make embossed soap using stamps
 Looking for a different spin on your melt and pour soap? Learn to make embossed soaps with stamps from The Craft B. Besides the normal supplies of glycerin soap, colorant, fragrance, and molds you will need clear stamps (the author gets the adhesive ones. I think you can find some in the scrapbooking aisle of your craft store). In this tutorial, a skull stamp is used but you can use any clear stamp that suits your fancy. Start now and have some fun!
Tuesday, January 10, 2012
Proper Candle Wick Testing Tutorial
Experienced candle makers often talk about test burning candles.. It seems like common sense that a candle maker who sells a product would know how their candles burn. It is a bit surprising that few candle makers actually have a system that will generate repeatable results. A lot of candle makers have different ideas about test burning. But what exactly does “test burn” mean and how do you go about doing that. The guidelines in the Proper Candle Wick Testing Tutorial from Candle Coocoon was created to help the beginning candle maker to better understand what a productive test burn involves in order to achieve reproducible results. The important thing to take away is that repetition is needed.
Monday, January 9, 2012
Cold Process Soap with a Twist
 Here is an interesting twist on a cold process soap recipe - You can add elaborate details to your Cold Process soap easily with fun melt & pour soap pieces. In the bars above, Anne Marie embedded a basic brown and black layered melt & pour loaf and some experimental marbliezed soap in green and white cold process soap. Want to learn how she did it? Then check out Anne Marie's instructions on How to Make Cold Process Soap with a Twist which appears on her site Soap and the Finer Things in Life. This is an advanced recipe that should take you 2 1/2 hours to complete (plus curing time) and wind up with 16 bars of soap.
Sunday, January 8, 2012
Herbal Lotion Bar Recipe
Love lotion bars? Well, you have to check out this recipe for a Herbal Lotion Bar that appears on the Mountain Rose Blog. This wonderful recipe came to them from their dear friend Rosalee de la Foret of HerbMentor.com! She is a clinical herbalist and Structural Medicine Specialist who lives on the edge of the wilderness in the Northeastern Cascade Mountains of Washington State. She contributes regularly to HerbMentor.com where you can find more fantastic recipes and she also writes about her herbal wisdoms and adventures at the Methow Valley Herbs Blog. The recipe includes only 4 ingredients in addition to your essential oil. Have fun trying this new recipe out.
Saturday, January 7, 2012
Neapolitan CP Soap for Valentine’s Day
 Here is a really cute idea for a Valentine's day gift - Neapolitan CP Soap. This intermediate tutorial appears on the website of the very famous Soap Queen should take you 45 minutes to make and yields 2.5 pounds of soap. What I really found interesting was how the hears on the top of the soap were made. Interesting enough, the invidiually colors are contained in squeeze bottles. I would have neve thought of that.
Friday, January 6, 2012
Winter Salt Soak
 Completing her winter bath and body products series, Anne-Marie (aka The Soap Queen) posted a recipe for a Winter Salt Soak
so you can treat your little tootsies to a warm, fizzy, epsom salt soak. Anne Marie says that epsom salt has been long known for it’s abilities as a natural remedy for so many ailments. Plus she has designed a special “sore muscle” essential oil blend that will diminish your foot cramps, aches and pains from a long day on the mountains. Once you finish soaking, you can later your feet with her winter balm recipe. Both recipes are very simple to make in no time at all, plus Anne Marie has provided a link to make the same labels she has in her photos.
Thursday, January 5, 2012
Peppy Cocoa Bubble Cookies
 Are you a person who loves to use bath fizzies everytime you take a bath? Well if you make your own bath fizzies or not, here is a an easy recipe that you make want to try - Peppy Cocoa Bubble Cookies from DIY Skincare. Even if you prefer to take a shower, this recipe would make great gifts for friends and family that prefer to take baths. Packaging can be just as easy - cellophane bags from your local craft store. You can get the plain clear bags or often times there will be colorful holiday bags out. Take it a step further and place the bag into festive food take out boxes from Michaels. But make sure to put on the label that these are not meant for eating!
Wednesday, January 4, 2012
Mango Avocado Balmy Salve Recipe
 The combination of butters (cocoa, avocado, mango), jojobo oil, tamanu oil make a love salve recipe. If you love the idea of this combination you many want to try this recipe from The Soap Queen. The recipe which is called Mango Avocado Balmy Salve appears on her blog Soap and the Finer Things in Life sounds absolutely delightful. You may not like eating avocados, but using avocado butter in a salve recipe does not sound so bad.
Tie Dyed Soap Project
 The supplies you will need for this project: Soap Colorant (liquid), Soap Fragrance,White Glycerin Soap, Soap Mold
The tools you will need: Microwave, Cutting board, Kitchen knife, Rubbing Alcohol, Plastic Wrap, Scissors, Tape
Tie Dyed Soap Making Instructions
Step 1 Select colorant and mold.
Step 2 Squeeze 2-3 drops of color directly into mold, scattering along the bottom. Hint: Try 2 colors for an unique effect. Try yellow/blue or red/blue. Tip: You can also try pouring the melted soap into the mold and then adding the drops of color and stirring it with a toothpick.
Step 3 Prepare white soap by melting it in a microwave safe container such as pyrex measuring cup. You will need approximately 3-4 ounces.
Step 4 Add a few drops of fragrance to the melted soap. stir with a spoon or a craft stick until well. incorporated.
Step 5 Pour melted soap base into the mold filling it to the top.
Step 6 Immediately spray the melted soap with rubbing alcohol. This will get rid of all air bubbles and help the color diffuse throughout the soap.
Step 7 Let set completely and unmold.
Tuesday, January 3, 2012
Winter Lip Balm Recipe
 Have you tried The Soap Queen's Winter Lip Balm Recipe yet? Well, if you have not seen it yet, you should try it. For those who are vegan and do not want to use beeswax, this recipe uses Candelilla Wax instead. If you are not a practicing vegan and would like to try a lip balm with Candelilla Wax this is one you should try. Like all recipes posted on The Soap Queen's site, you can purchase all ingredients through Brambleberry.
I have to admit when I saw this posting on The Soap Queen's site, Soap and The Finer Things in Life , I thought that the labels she used were really cute and was wondering how she created them. I was not expecting to see any information about the labels, but surprisingly enough Anne-Marie has kindly provided a link to print the same exact label to used on your finished products. If you would like to see the PDF file of these adorable labels, check out this link for the free Super Cute Winter Labels.
Monday, January 2, 2012
Almonds, Chocolate and Lavender (CP Soap Tutorial)
 As I browosed my daily listings of the sites I follow, I came across this interesting cold process recipe for Almonds, Chocolate and Lavender on The Soap Queen's blog - Soap and the Finer Things in Life. I thought that chocolate and almonds in a soap recipe, but I was not sure how the lavender plays a part or effect the other two. According to the introduction, the fragrance oil blend of chocolate and lavender is a gourmet candy like combination (think sophisticated foodie chocolate). This fragrance combonation is added to almond milk byproduct of almond meal is a gentle exfoliant and a lovely way to get a little more cleaning power from your bar. When reading this recipe, it gave me the idea it would be the perfect gift for the foodie in your life or given to your sweetie at Valentine's Day.
This would be a really interesting to try for the intermediate cold proess soap maker. It should take you 45 mins (without curing time) and yield you about 2 pounds of soap.
Sunday, January 1, 2012
Swirled Heart Cold Process Soap
Kristy Schemrich of Kristy’s Lovely Lathers shows how to make the cutest little heart design in the top of your Cold Process soap on Soap Queen TV. Make Swirled Hearts Cold Process Soap from Soap Queen on Vimeo. This is a really cute project to make for your Valentine for the upcoming Valentine's Day.
If you would like to see the full list of ingredients for this projects, check out the Swirled Heart Cold Process Recipe on The Soap Queen's Blog - Soap and the Finer Things in Life.
Subscribe to:
Comments (Atom)
