Sometime ago, I was watching an episode of the Martha Show where she was discussing beeswax candles. She said that color and fragrance does effect the burn time of candles. I was in doubt and so I went to search to find out the answer to this burning question - no pun intended. I found out reading the article, Why Some Candles Burn Fast on the website Happy News that color does not factor in to your candle burning any faster than a plain candle. What really does make the candle burn faster? Well, the first thing is that the wick size is the primary factor determining candle-burning rate. If you use a large wick it will speed up the burn time of the candle. Also what it is important to know is that Wax is the most important ingredient that makes a candle burn faster. Soft wax has a higher oil content and lower melt temperature; therefore, it burns faster. Typically, candles in jars have soft wax, and pillar candles have hard wax. The longest burning candles are pillar candles made of a blend of beeswax and paraffin.
Now the National Candle Association may differ on this question. If you would like to find out, the National Candle Association has information on how to conduct your own science project to find out. If any experienced candlemakers out there would like to chime in on this subject, please let us know your thoughts on this matter whether from your own experience or articles that your have read.
Saturday, December 31, 2011
Friday, December 30, 2011
Burgandy Lip Stick
 Love to add a little color to your lips? Would you like to create your own natural lip color? Then I would highly recommend making this Burgandy Lip Stick recipe from DIY Skincare. I love the burgandy color but I am not sure if it would go well with my skintone, so I may consider using another color.
Thursday, December 29, 2011
How to Label Cold Process Soap
 Are a beginning soapmaker and do not have the foggiest idea on how to label your cold process soap? In this second series article, How to Label Cold Process Soap by Anne Marie (aka The Soap Queen) gives you want you need to know what you need to know how to label your soap in addition she gives you suggestions on where to look for additional information. In her first article, How to Label Lip Balm she explains including how to list your ingredients using the proper terms in the correct order. In addition she gives you a recipe for Funnel Soap that you should try.
Wednesday, December 28, 2011
Winter Lip Butter
 Winter is now upon us and what do we do about our chapped lips? Well, I found this Winter Lip Butter recipe by Alison Kontur of Bath Body Supply. This appears on Alison's blog "Design It Yourself" Skincare.
What is really interesting are the ingredients for this recipe. The ingredients that you will need for this recipe are Shea Butter, Jojoba Oil - Clear/Organic, Macadamia Nut Oil, Jojoba Wax Pastilles, Menthol Flavor Fragrance Oil, Sweetener Powder (optional)and Radiant Gold Mica (optional). I guess the most interesting ingredient for me is the jojoba wax pastilles. The reason why is that I have never heard or used this ingredient before. If I made a lip balm in a pot before I have used beeswax pastilles. But if you were creating it for a vegan one would use carnuba wax. I guess jojoba wax pastilles would be a subsitute for beeswax. Now that I have seen this ingredient, I am interested in looking for more information about it. Has anyone out there used it before?
Tuesday, December 27, 2011
Staying Organized While Blogging – Seven Simple Tips
If you are someone who has been blogging for years or just started, you may want to read this article titled, Staying Organized While Blogging – Seven Simple Tips from the site
Handmade Marketing...You Can Sell Handmade, Here's How is the perfect article for you whether you are blogging for the fun if it to selling handmade crafts. The author for this article is from New Zealand and has had a variety of jobs in her lifetime. Since 2009, the author has created a blog and has been learning how to balance a blog and other areas of her life ever since.
Handmade Marketing...You Can Sell Handmade, Here's How is the perfect article for you whether you are blogging for the fun if it to selling handmade crafts. The author for this article is from New Zealand and has had a variety of jobs in her lifetime. Since 2009, the author has created a blog and has been learning how to balance a blog and other areas of her life ever since.
Monday, December 26, 2011
How to Tint Beeswax
Beeswax is a popular material for candle making because it is a natural, unrefined product. Beeswax candles burn cleanly and do not drip, making them an attractive choice. Many home crafters dabble in candle making and often choose the work with beeswax. Whether making dipped or molded candles from beeswax, melt it carefully and slowly. Once the beeswax melts, at just over 140 degrees, you can tint the beeswax, if desired, before dipping or molding the candles. If you would like to learn how to color your beeswax candles, I would recommend reading the article, How to Tint Beeswax by ehow contributor, Kathryn Hatter.
Sunday, December 25, 2011
Soy Fun Facts
Recently I have been making candles with soy wax and I was wondering more information about this particular eco-friendly wax. According to Crazy Pineapple:
•Soy wax cleans up easily with soap and water.
•Trim the wick down to 1/4" before lighting a soy wax candle to ensure a longer and cleaner burn.
•Do not allow wick trimmings to fall into your wax melt pool.
•Burn soy candles in areas free from drafts. All Soy Candles are Not Created the Same.
•A candle only needs to have 25% soy to be called a soy candle!
•Beware of imitators. Unless a candle says 100% Soy, you may be getting 25% Soy blended with 75% paraffin (petroleum).
•If soy wax candles are sold in a stand-alone form, that is not in any type of container, they may contain paraffin. 100% pure soy wax candles melt like oil, so they must be in a container.
Hope you find this information helpful. If anyone out there is an expert candlemaker, who would like to add to this list, please let us know and I will add it to the list.
Saturday, December 24, 2011
Menthe Botanical Bath Salt Recipe
 Love peppermint and spearmint? In this bath salt recipe combines both.
This Menthe Botanical Bath Salt Recipe from DIY Skincare would make the perfect gift who loves taking a long soak in the bath tub. This recipe is easy to make for any occassion.
Friday, December 23, 2011
Simple Soy Candles
 Candles make a fantastic addition to any gift basket that you are putting together for a holiday present. This Simple Soy Candle project from The Soap King would be the ideal addition to your bath and body gift basket to make a complete spa treatment. If you did not know that soy wax burns cleaner than most other wax products. Plus, they are easy enough for absolute beginners to make.
Thursday, December 22, 2011
Mango Cocoa Lip Balm
 Are you having problems finding lip balm recipe that does not contain beeswax? Here is a lip balm recipe that uses candelillia wax instead. This Mango Cocoa Lip Balm recipe from DIY Skincare is perfect for someone who is a vegan.
Wednesday, December 21, 2011
Holiday Ribbon Candy Soap: Melt and Pour
 I always remembered my grandmother having these ribbon candies in a candy dish at the holidays. Sometime ago I was at Opalz Zoaps in Palo Alto and they had a fragrance called candy ribbon from Brambleberry that brought back fond memories of my grandmother. If you would like to bring back memories of Christmas past like I would highly recommend making these Melt and Pour Holiday Ribbon Candy Soaps which appears on The Soap Queen's site Soap and the Finer Things in Life.
Looking at these soaps make my mouth water, how about you? If you package these soaps, I would recommend putting a warning label because they look good enough to eat.
Tuesday, December 20, 2011
How to make Body Lotion Bars with Coconut Oil
 Lotion bars are a great alternative to regular liquid lotions. Lotion bars are also easy to make. When you make them yourself at home, you have the opportunity to scent your lotion however you see fit and to make as much or as little as you like. Make just one bar for personal use, or make a whole bunch to give as gifts. You can make delicious-smelling lotion bars in no time at all. Want to learn how? Then check out the article How to make Body Lotion Bars with Coconut Oil byIrena Eaves, eHow Contributor. These would make great gifts to make or for your own use.
Monday, December 19, 2011
Gingerbread Bath Cookies
 One of the aroma of the Christmas holidays that puts me in the mood is gingerbread baking in the oven. If you love this aroma as much as I do and want to enjoy it in your bath during the Christmas holidays and all year round, then I may the suggestion of making this Gingerbread Bath Cookies recipe by Alison Kontur of Bath Body Supply. Alison graciously shares this recipe on her blog DIY Skincare. If you like this recipe, you should check out her blog for more lucious recipes.
Sunday, December 18, 2011
Gift Wrap: Using Dictionary Pages for Soap & Small Gift Items
 Are you looking for ways to recycle your dictionary pages? Denise from Go Planet Earth made a great suggestion on her blog Denise's Yadda Yadda that you can use pages from your dictionary to wrap your soap and small gift items for the holidays. What I thought was a great idea is that you can purchase books from the Goodwill store and use them for this purpose but she recommends wrapping your soap with brown paper before putting wrapping your soap with the pages from your book. If you would like to read the full article it is called, Using Dictionary Pages for Soap & Small Gift Items.
Saturday, December 17, 2011
Christmas Jelly Roll Soap
 Want to learn how to create this really cool Christmas Jelly Roll soap from The Soap King? All you have to do is follow The Soap Queen's video on The Soap King's blog and change the color and scent. For the red color, The Soap King blended red labcolor, merlot mica and red glitter, used liquid white for the white, and green chrome oxide for the background, all with our bulk clear base. The fragrance blend he used is Christmas Tree Cybilla and Peppermint 2nd Distillation. He says to make sure to add liquid glycerin to the roll so it bends and spray rubbing alcohol so everything sticks together. What a fantastic idea for gifts to make for the holiday season!
Friday, December 16, 2011
Beyond Soap: Packaging to Sell
 Are you looking for something different to package your soaps for this holiday season? Denise from Go Planet Earth posted this clever idea on her blog Denise's Yadda Yadda about going beyond on packaging your soap to sell. Even if you do not sell your soap and giving out them out for gifts her idea of wrapping your soap with craft paper and then with a cigar wrap special holiday message. This idea can work for any work for any special occassion, not only Christmas.
Thursday, December 15, 2011
Super Easy Christmas Swirl Soap
 When I saw picture for this Christmas Swirl Soap on The Soap King Blog I thought it might be a cold process recipe but it is not! Boy was I fooled. Actually melt and pour bar of soap. Want to learn how to make it, then check out the simple instructions (Chrismas Swirl Soap). This project takes about ten minutes to make ten bars of soap. Talk about quick and easy Christmas gifts! Of course, there is a little wait time for the loaf to harden in the freezer (45 minutes to an hour).
Wednesday, December 14, 2011
Artistic First Snow M&P Soap
 Here is a new recipe from Wholesale Supplies Plus. This Artistic First Snow Melt and Pour Soap Bar is a perfect project for the beginner. It takes approximately six hours to complete the project and this recipe makes approximately 12 5.5-6 oz bars. All supplies you need to make this beautiful bar of soap can be purchased through Wholesale Supplies Plus.
Tuesday, December 13, 2011
Winter Wonder Lotion Bars
 Lotion bars feel great on dry winter skin. How would you like to make your own? From Wholesale Supplies Plus is a recipe called Winter Wonder Lotion Bars which you may want to create to use for yourself or give out as gifts during this holiday season. These are much larger than most lotion bars so that you have plenty to use on typically winter dry areas such as elbows, knees and arms and shins.
Monday, December 12, 2011
Very Vanilla Lip Scrub Recipe
 Winter is just around the corner and our poor lips will get chapped due to the cool weather. So it will be time to exfoliate prior to using your favorite lip balm. Here is a perfect recipe to make your own. This Very Vanilla Lip Scrub recipe from DIY Skincare uses only 5 ingredients which includes organic sugar, refined shea butter, meadowfoam seed oil, organic vanilla bean specks and vanilla swirl flavoring. Once you finish the recipe it should look like the photo which is from Smell No Evil. Even though this is a very simple recipe, I thought it was interesting that the author used meadowfoam oil. I may have heard of it, but have never used it in any of my body products before so I may have to give it a try to see what it is like.
Sunday, December 11, 2011
Chai Latte CP Soap Tutorial
 Are you a big fan of Starbucks? Well, Anne-Marie (aka The Soap Queen) so happened to post on her blog Soap and the Finer Things in Life this post written by Amanda Griffin of Lovin' Soap for Chai Latte Soap.
Now I am not a coffee drinker and I rarely go into Starbucks but I think this really unique soap. But really makes this more adorable is the packaging and labelling. Wouldn't it be cute to make this bar of soap and attach a Starbuck's card and give it to someone who frequents Starbucks? Just a thought!
Saturday, December 10, 2011
Lump Of Coal Soap
 Has someone been naughty and you want to give them lump of coal in their stocking? Then how about creating this melt and pour Lump of Coal Soap project from The Soap Queen. This project appears on her blog Soap and the Finer Things in Life and it perfect to make for the upcoming Christmas holiday. It takes only 20 minutes to make 4 soaps. So get your list together to see you should receive coal in their stocking this year!
Friday, December 9, 2011
How to Make Body Butter Bars
 Everyday of the year is a great time to pamper your skin. But there are probably times of the year that one may need to pamper their skin. Winter maybe one of them. So why not create your own body butter bars? In the step by step instructions by eHow Fashion, Style & Personal Care Editor, How to Make Body Butter Bars makes it really easy to create your own so you cannot go wrong nourishing your skin. These bars are simple to make that you can easily alter the recipe to change the scent to your liking. These would make a great gift for your friends for the upcoming holiday season.
Thursday, December 8, 2011
Hot Process Soap Making - Old Fashioned?
Is hot process soapmaking old fashion or not? Would you like to find out? In this article, Hot Process Soap Making - Old Fashioned? by Gary Everson which appears on E-zine Articles. The author describes his journey as someone who makes soap for a hobby the flustrations that a cold process soap making can encounter and finds that hot process soap making side steps some of this issues.
Gary Everson is the Soap Business Guru, he has a free ten part email course called All About Soap Making, which provides a great introduction to soap making and a free monthly newsletter called Soapy Business, which is packed with advice, tips and tricks for making home made soap, you can sign up to receive both at http://soapybusiness.com/.
Gary Everson is the Soap Business Guru, he has a free ten part email course called All About Soap Making, which provides a great introduction to soap making and a free monthly newsletter called Soapy Business, which is packed with advice, tips and tricks for making home made soap, you can sign up to receive both at http://soapybusiness.com/.
Wednesday, December 7, 2011
Cup of Joe Melt and Pour Soap
 Love that cup of Joe to wake you up in the morning? Would you like to have an additional jolt with your morning shower by using this Cup of Joe Soap? Learn to create this melt and pour soap in this video called Cup of Joe Soap Slices Video from Go Planet Earth.
 Tuesday, December 6, 2011
Peppermint Stick Candle Project

Peppermint stick candies are a familiar to the Christmas holiday season. If you want to incorporate peppermint sticks into your holiday decor, you may want to try making your own candle sticks with this easy tutorial from One Stop Candle called Peppermint Stick Candle Project. This candle project is primarily a surface technique meaning that you do not need to make the core candle yourself if you prefer to buy candles already made. If you would like to create your own core candles but do not know how, then you would want to read the free tutorial that the author recommends reading.
PLEASE NOTE!! - This technique requires dipping in hot wax so all normal candle making safety rules apply
Monday, December 5, 2011
Goat Milk & Honey Lotion
 Here is a simple lotion recipe for beginners or for crafters who need a quick and easy addition to their product line. This Goat Milk and Honey Lotion Recipe from Wholesale Supplies Plus
 will take you about a half hour and will make (10) 8 oz jars, (5) 4oz, (5)2 oz.
Sunday, December 4, 2011
Naturally Trimming The Christmas Tree
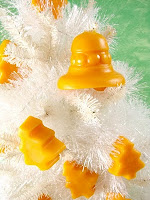 Here is something different to decorate your tree with. How about creating minature beeswax ornaments? This natural trimmings idea is from Anne-Marie (aka The Soap Queen) who posted the instructions on her blog Soap and the Finer Things in Life. When I saw this idea, I thought how cute these were and would be perfect for someone who decorates with a tabletop tree.
What is really great about this project is that if you have alot of those silicone ice cube trays like I do then you can make alot of different ornaments. Now I have another use for my silicone ice trays besides making soap embeds.
Saturday, December 3, 2011
Cool Yule Peppermint Loaf
 Bramble Berry was recently mentioned in the 2011 Martha Stewart Holiday Handbook. Martha did a wonderful red and white striped soap project using melt and pour soap. Even though Bramble Berry was just noted as a supplier (and not the author of the recipe), Bramble Berry received a ton of calls in customer service asking how to make the “Martha Soap” which they were so happy to help with (and they are so proud to be associated with! Thanks Martha and team!). The calls inspired Anne Marie to create her own “Martha Inspired” peppermint layer loaf. This project is for the intermediate melt and pour soapmaker and should take 2 hours to complete. And this recipe makes 60 oz of soap which makes alot of gifts for the holiday season. I really like the look of this soap loaf recipe I am going to have to try it myself!
Friday, December 2, 2011
Holiday Soap with Papier Mache Decoupage Box
From "Crafters Coast to Coast"episode HCC2C-165F Jill McDowell from Liberty, Kan. shares her passion for cleanliness when she makes her "Velvet Spice" holiday scented soap. But she doesn't stop when the soap is cured--she continues on, making a festive papier-mache decoupage gift box to complete the project.
The materials she used for this project: 2 stainless steel pans, wooden spoons,mixer, fragrance, oils scale, measuring cup, thermometer, spring water, soap molds, plastic wrap and microwave.
Steps:
1. Line soap molds with plastic wrap.
2. Mix oils together in large stainless steel pan. Mix sodium hydroxide (lye) separately in other pan with measured amount of water. Allow sodium hydroxide mixture to cool. You can place it in a cool bath in the sink to speed up the process.
3. After lye mixture has cooled to about 76 degrees, check temperature of oils. They should also be about 76 degrees. Once this has occurred, pour lye mixture slowly and carefully into oil mixture.
4. With mixer on low setting, mix for about 5 minutes and then add fragrance, mixing as you stir in fragrance to almost a pea soup consistency.
5. Carefully pour soap into prepared molds, making sure you get an even amount in each mold. Cover each mold with blankets, making sure they are free from any drafts. Allow to set (don't peek!) in molds for 24 hours.
6. Either with a knife or soap cutter, cut each into desired size bars. Allow to cure for up to 6 weeks (on a closet shelf would be perfect!).
7. To wrap: After you have allowed your soap to cure for about 6 weeks, you are now ready to package it. We use glossy white wrapping paper to wrap it just lie you would a package. We then add hemlock pinecones along with dried flowers attached with a hot glue gun. Tie with a pretty ribbon. You now have a wonderful bar of soap!
8. To make boxes: Gather desired number of papier-mache boxes you wish to make. Find copyright-free computer graphics you wish to use on the box. After you have chosen a graphic, print graphic on regular white paper using your printer. If you use the postcard format, you'll be able to get two on one piece of paper.
9. Cut graphic from postcard format. Place graphic on top of box lid to center design and cut off excess edges so that it fits perfectly on lid of box. Glue to box lid with white glue.
10. Paint bottom of box with a coordinating color of craft paint, making sure to paint around sides of lid. Allow box to dry about 20 minutes. After box is dry, apply varnish over entire box and allow to dry about 20 minutes more.
11. Place wrapped bar of soap into box. You may put a little potpourri in bottom of box before placing soap in box.
If you would like to view the segment where Jill demonstrates this project before you try making her soaps, then I suggest viewing the following clip:
Thursday, December 1, 2011
Melt & Pour Soap Making: Candy Cane Curl Loaf
One of my favorite candies during the holiday season is the candy candy (of course). If you also like this candy or know some one who does then why not create soap that mimics their favorite candy.
I found this video tutorial from Go Planet Earth for a Candy Cane Curl Loaf Soap that can help you make these soaps for holiday gifts.
I found this video tutorial from Go Planet Earth for a Candy Cane Curl Loaf Soap that can help you make these soaps for holiday gifts.
Subscribe to:
Comments (Atom)
