Here is a simple lotion recipe for beginners or for crafters who need a quick and easy addition to their product line. This Goat Milk and Honey Lotion Recipe from Wholesale Supplies Plus will take you about a half hour and will make (10) 8 oz jars, (5) 4oz, (5)2 oz.
Here is something different to decorate your tree with. How about creating minature beeswax ornaments? This natural trimmings idea is from Anne-Marie (aka The Soap Queen) who posted the instructions on her blog Soap and the Finer Things in Life. When I saw this idea, I thought how cute these were and would be perfect for someone who decorates with a tabletop tree.
What is really great about this project is that if you have alot of those silicone ice cube trays like I do then you can make alot of different ornaments. Now I have another use for my silicone ice trays besides making soap embeds.
Bramble Berry was recently mentioned in the 2011 Martha Stewart Holiday Handbook. Martha did a wonderful red and white striped soap project using melt and pour soap. Even though Bramble Berry was just noted as a supplier (and not the author of the recipe), Bramble Berry received a ton of calls in customer service asking how to make the “Martha Soap” which they were so happy to help with (and they are so proud to be associated with! Thanks Martha and team!). The calls inspired Anne Marie to create her own “Martha Inspired” peppermint layer loaf. This project is for the intermediate melt and pour soapmaker and should take 2 hours to complete. And this recipe makes 60 oz of soap which makes alot of gifts for the holiday season. I really like the look of this soap loaf recipe I am going to have to try it myself!
From "Crafters Coast to Coast"episode HCC2C-165F Jill McDowell from Liberty, Kan. shares her passion for cleanliness when she makes her "Velvet Spice" holiday scented soap. But she doesn't stop when the soap is cured--she continues on, making a festive papier-mache decoupage gift box to complete the project.
The materials she used for this project: 2 stainless steel pans, wooden spoons,mixer, fragrance, oils scale, measuring cup, thermometer, spring water, soap molds, plastic wrap and microwave.
Steps:
1. Line soap molds with plastic wrap.
2. Mix oils together in large stainless steel pan. Mix sodium hydroxide (lye) separately in other pan with measured amount of water. Allow sodium hydroxide mixture to cool. You can place it in a cool bath in the sink to speed up the process.
3. After lye mixture has cooled to about 76 degrees, check temperature of oils. They should also be about 76 degrees. Once this has occurred, pour lye mixture slowly and carefully into oil mixture.
4. With mixer on low setting, mix for about 5 minutes and then add fragrance, mixing as you stir in fragrance to almost a pea soup consistency.
5. Carefully pour soap into prepared molds, making sure you get an even amount in each mold. Cover each mold with blankets, making sure they are free from any drafts. Allow to set (don't peek!) in molds for 24 hours.
6. Either with a knife or soap cutter, cut each into desired size bars. Allow to cure for up to 6 weeks (on a closet shelf would be perfect!).
7. To wrap: After you have allowed your soap to cure for about 6 weeks, you are now ready to package it. We use glossy white wrapping paper to wrap it just lie you would a package. We then add hemlock pinecones along with dried flowers attached with a hot glue gun. Tie with a pretty ribbon. You now have a wonderful bar of soap!
8. To make boxes: Gather desired number of papier-mache boxes you wish to make. Find copyright-free computer graphics you wish to use on the box. After you have chosen a graphic, print graphic on regular white paper using your printer. If you use the postcard format, you'll be able to get two on one piece of paper.
9. Cut graphic from postcard format. Place graphic on top of box lid to center design and cut off excess edges so that it fits perfectly on lid of box. Glue to box lid with white glue.
10. Paint bottom of box with a coordinating color of craft paint, making sure to paint around sides of lid. Allow box to dry about 20 minutes. After box is dry, apply varnish over entire box and allow to dry about 20 minutes more.
11. Place wrapped bar of soap into box. You may put a little potpourri in bottom of box before placing soap in box.
If you would like to view the segment where Jill demonstrates this project before you try making her soaps, then I suggest viewing the following clip:
One of my favorite candies during the holiday season is the candy candy (of course). If you also like this candy or know some one who does then why not create soap that mimics their favorite candy.
I found this video tutorial from Go Planet Earth for a Candy Cane Curl Loaf Soap that can help you make these soaps for holiday gifts.
I have a B.A. in Mass Communication and took my first melt and pour soapmaking class in 2002. Since then I got hooked making my own bath and products. I have taken various courses in Soapmaking (Melt & Pour, Cold Process, Hot Process), lotion making (lotions, creams, lotion sticks), bath products (bath salts, body scrubs), body products (lip balm, body butters, body balms, whipped butters) and more. Most of all of my classes were taught by Lori Nova of The Nova Studio in Point Richmond, Ca. I have taught courses since 2004 at various locations. I have worked as an Event Coordinator at Michaels Redwood City.
 Here is a simple lotion recipe for beginners or for crafters who need a quick and easy addition to their product line. This Goat Milk and Honey Lotion Recipe from Wholesale Supplies Plus
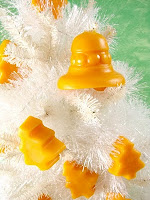 Here is something different to decorate your tree with. How about creating
  Bramble Berry