Wednesday, June 30, 2010

Lunar Rock Soap

Do you love the soaps that look like rocks?  Then create this soap by Wholesale Supplies Plus.  It can be slicked or cut into large chunks to look like rocks!

Project Level: Advanced.

Estimated Time: 1 Hour
Yields: (12) 4 oz Rocks

INCI Ingredient Label: Propylene Glycol, Sorbitol, Glycerin, Sodium Laureth Sulfate, Sodium Stearate, Sodium Myristate, Sodium Cocoyl Isethionate, Triethanolamine, Water, Fragrance, Mica (and) Titanium Dioxide (and) Iron Oxides, Mica (and) Iron Oxides (and) Carmine, Diazolidinyl Urea, Methylparaben, EDTA, Benzophenone 4

Ingredients

• 3 Pound(s) Crafter's Choice Extra Clear Soap Base
• 1 Ounce(s) Crafter's Choice Sweet Rain Fragrance Oil
• 1/2 Cup(s) Crafter's Choice Mica Powder - White
• 6 ml(s) Crafter's Choice Liquid Pigment - Ultramarine Blue
• 1 Tablespoon(s) Crafter's Choice Liquid Sparkle - Flamingo Pink
• 1 Tablespoon(s) Crafter's Choice Liquid Sparkle - Silver
• 1 Tablespoon(s) Crafter's Choice Liquid Sparkle - Emerald Green

Equipment

• Mold: Rectangle Silicone Loaf
• Bowls - 4 Wide Mouth
• Double Boiler
• Droppers - Plastic
• Gloves
• Ladle (if you choose loaf variation)
• Measuring Cup - Small Plastic, 1 oz
• Plate - Disposable Paper
• Rubbing Alcohol with Fine Mist Sprayer
• Scale - Digital
• Soap Slicer/Cutter
• Spoon
• Stove Top
• Thermometer - Digital

Directions

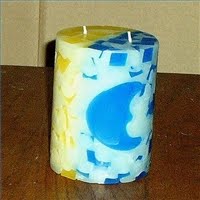
This recipe calls for the soap to be shaped into soap balls. A fun variation is to press the soap into the Crafter's Choice Basic Rectangle Silicone Loaf Mold. Instead of dipping soap balls to create colored layers, drizzle different colors of soap to create layers. Allow 4-6 hrs before slicing.

Using a soap slicer, cut clear soap into 1-2" pieces. The soap slicer is dull and perfect for this project. Do not use a knife as it is very sharp and the soap is slippery. The knife could slip causing injury.

Place white powdered mica in a shallow, wide mouth bowl.

Cut 1 pound of clear soap into smaller 1/4" pieces. Spritz this soap with rubbing alcohol and roll in generous amounts of white mica. Set aside on paper plate.

On the stove top and in a double boiler, melt 2 pounds of clear soap (the double-boiler prevents burning). Note that if this is more soap than your double boiler can hold, you can melt 2 pounds at a time.

Once fully melted, pour 1/2 pound of soap into one mixing bowl. Color with Emerald Green color. Mix well. Add 8 ml of fragrance. Mix well. Set aside. For future reference we will call this bowl 1.

Pour 1/2 pound of soap into second mixing bowl. Color with Ultramarine Blue. Mix well. Add 8 ml of fragrance. Mix well. Set aside. For future reference we will call this bowl 2.

Pour 1/2 pound of soap into third mixing bowl. Color with Pink Liquid Sparkle. Mix well. Add 8 ml of fragrance. Mix well. Set aside. For future reference we will call this bowl 3.

Pour 1/2 pound of soap into fourth mixing bowl. Color with Liquid Silver. Mix well. Add 8 ml of fragrance. Mix well. Set aside. For future reference we will call this bowl 4.

Once bowls 1-4 are at 130ยบ F, pick up the clear chunked soap that has been rolled in mica. Spritz again with rubbing alcohol.

Begin to squeeze and mash these chunks together. Dip the mashed soap into the melted bowl 1. Take out and continue to mash. The gloves you are wearing will prevent any burn to your skin.

Continue to squeeze and mash into a ball. Dip into soap, mash, add additional mica rolled chunks, dip into bowl 2 and mash.

When you are squeezing and mashing the soap, push your thumb into the soap ball so that colors can move further into the ball. Continue to mash and dip until the color begins to have dark layers. Slowly start to form a ball.

Quickly roll the entire ball into mica. Occassionally doing this full "mica roll" will give your soap the deep veins which look really cool when the soap is sliced.

Dip the ball into bowl 3, add more small chunks of mica soap, then squeeze together. Continue to dip and squeeze until the ball is the size you desire and are ready for another layer of color.

Set aside on cooling rack or paper plate until fully cooled. Approximately 2 hours.

Using a soap slicer, cut into cool geometric shapes.

The soap is ready to use after unmolding. If you plan to sell your soap, wrap it immediately. Options are plastic wrap, shrink wrap or cello bags. Proper packaging keeps the fragrance strong. Don't forget to label the soap to complete the package. Label according to FDA cosmetic label guidelines.

Source: http://wholesalesuppliesplus.com/RecipeDetail.aspx?RecipeID=39

Tuesday, June 29, 2010

4th of July Star Bath Bombs

Let The Soap Queen show you how simple and fun making bath fizzies to celebrate the 4th of July. This project appears on her blog Soap and the Finer Things in Life.

First, she creates a multi-colored star with a Soapylove stacked star soap mold and then she show show to use our stainless steel sphere mold to make the ever popular round bath bombs.

Here are the ingredients to make the star fizzies you will need:

1 cup Citric Acid
2 cups Baking Soda
18 ml Coconut Citrus Sorbet
Gurlie Pink LaBomb Color
Adobe Brick LaBomb Color
Cornflower Blue LaBomb Color
Witch Hazel
SoapyLove Stacked Star Mold

To order any of these supplies, visit Bramble Berry website.

To make the mondo lavender bombs:

1 cup Citric Acid
2 cups Baking Soda
3 Tablespoons Kaolin Clay
18 ml Lavender Essential oil
Lilac LaBomb Color
Stainless Steel 2 piece Sphere mold

IF you would like to see the video on how to make these star bath fizzies:


How to Make Bath Fizzies from Soap Queen on Vimeo.

Cappuccino Milk Bath Recipe

Love Cappuccino? Here is a great recipe from The Natural Beauty Workshop on how to make Cappuccino Milk Bath. This recipe makes (1)  20 oz. (by volume) container:

Ingredients


•1/4 cup Baking Soda
•1/4 cup Dendritic Salt
•1 cup Oat Flour, Fine
•1 cup Whole Milk Powder
•2 tablespoons Cocoa Powder
•1/2 ounce Vanilla Frappuccino Fragrance Oil*

Directions

In a medium sized mixing bowl, combine the Baking Soda and Dendritic Salt, and stir well. Measure and pour 1/2 ounce of Vanilla Frappuccino Fragrance Oil into the bowl and mix it well to disperse the oil. Next, add 1 cup of Oat Flour and 1 cup of Whole Milk Powder and stir again, making sure to break up any clumps. Measure 1/2 cup of the mixture and set it aside in a smaller bowl. Add two tablespoons of Cocoa Powder to the large portion of mixture and stir it well to disperse its color. You can add more Cocoa Powder if you want the color of the powder to be more dramatic. Spoon the brown mixture into the container first, followed by the white portion of mixture. Make sure to tap the powder down as you are filling the container so that you can fill it completely.

Usage & Packaging

This recipe was created for use with our 3x6 Acetate Rounds, but it would look lovely in almost any tall, clear jar. Make your batch look extra scrumptious by adding a Wooden Scoop, a Brown Ribbon, and Natural Beauty Printable Tags (Please note that they are only to be used for personal use) . Download them here:  Download Cappuccino Milk Bath Labels

*To create an all natural version of this recipe, substitute our Roasted Coffee Oil and a few drops of Vanilla Absolute for the Fragrance Oil.

Monday, June 28, 2010

4th of July Soaps

Check out how to make these patriotic soaps from The Soap Queen. This melt and pour project yields 4 soaps.

Ingredients
Stars Mold
Slim Square Mold
Liquid Blue
Non-bleeding Red
Glitter
16 oz. Clear soap
4 oz White soap
Beach Breezes

IF you would like to order any of these suppplies, please visit Brambleberry's website.

Directions:

ONE: Melt 4 ounces of white melt and pour soap base, stir in your favorite fragrance oil. Fill each star cavity. Let cool and unmold.

Variation: Add Liquid Red or Liquid Blue to 4 ounces clear soap base with a splash of glitter if you want to embed colored stars.

TWO: Melt 16 ounce of clear soap base in the microwave. Add a tiny bit of liquid blue colorant to get a clear effect (for more info on the “bluing” technique see this Soap Queen TV video). Do not add fragrance at this time.

THREE: Pour a 1/8” thick layer of the clear soap into each cavity of the Slim Square and spritz with rubbing alcohol.

FOUR: Spritz the thin clear layer of soap and soap stars with rubbing alcohol. Then pour another thin layer of clear soap into each cavity and place your stars into the melted soap. Make sure that your soap is around 125 degrees to avoid melting the soap stars.

FIVE: To the remaining melted clear soap base, add your favorite fragrance oil and either red or blue colorant (and glitter if you’re feeling sassy). Mix well.
SIX: Spritz the cooled layer of soap with the stars and pour your final colored background layer. Spritz again with rubbing alcohol to get rid of any air bubbles. Let the soaps cool, pop them out of the mold and celebrate the 4th of July with your friends and family.

IF you would like to see more color photographs of these soaps, check out the full instructions for the 4th of July Star soaps on the Soap and Finer Things.

Tropical Whip Body Butter from Ponte Verde

Makes 16 ozs. (EASY)

Ingredients:

~16 ozs of Shea-Body Butter Base
~1/2 - 1 oz of your favorite fragrance or essential oil (we used Bananaroma)
~glass measuring cup or bowl
~container/s

Directions:

Add all the ingredients to the glass measuring cup, mix in the fragrance or essential oil and spoon into jars. It's very rich and fluffy much like store bought body butters but without the unnecessary chemical ingredients. Will add a silky glow to freshly tan skin.

Note:

Recommended for use on the face. Our Shea-Body Butter Base contains aloe vera and a preservative so there's no need to add one. Shelf life - 2 or 3 years.

Sunday, June 27, 2010

Botanical Bath Melts Recipe

If you like bath bombs and tub treats, but you are wondering what the combining the two would be like then you should check out this Botanical Bath Melts Recipe from Erica at The Bonnie Bath Company.

I was drawn to this recipe because of the picture in the blog entry, but according to Erica the melts in the picture were made by Highland Soaps and the recipe she shared on her blog is not associated with them but wanted to show an artisan product.

Ingredients
8 oz Cocoa butter
1 cups Baking soda
¼ cup Corn starch
½ cup Citric acid
2 tsp Fragrance or essential oil
½ cup dried flowers or herbs

Directions:

Melt the cocoa butter. Remove from heat and stir in the scent and powdered ingredients. Place into molds. Allow to set for 2-3 hours. Remove from molds and roll in dried botanicals until covered.

Saturday, June 26, 2010

Soothing Herbal Balls

Here is a fun and creative item that I saw demonstrated on The Katie Brown Workshop, Oct 26,2008 on KCSM.

Materials
Dried herbs
Ribbon
Grape vine balls
Floral pins

Tools
Scissors

Getting Started

1. Take a small bouquet of dried herbs and wrap the stems with ribbon, leaving a foot and a half of ribbon on both sides.

2. Using floral pins, tack the bouquet to a grape vine ball.

3. Add as many bouquets as you like to the ball.

4. Tie the remaining ribbon in a bow and hang on a doorknob or bedpost.

Friday, June 25, 2010

Brownie Party Bites Tutorial

Having a special party like a bridal or baby shower and do not have a favor to give out.  Love brownies, but don't like the calories?  Then how about making your favorite treat into candles?  If you think this a cute idea for your get together then check out this simple tutorial (Brownie Party Bites)  from Wholesale Supplies Plus.


Thursday, June 24, 2010

Wrapping Party Favors from Martha Stewart


Extend your palette with pretty favors in green and brown that are a delight to behold. Familiar materials -- paper bags, cardboard boxes, crepe paper, twine -- are easily made into sophisticated packaging with ribbon or decorative paper. Fill with soaps, candy, or any other little treat, and place on each plate, or group together on a favor table.
1. Sheets of origami paper by Aitoh Co. are the right size to wrap the lid of this oatmeal-color box by U.S. Box (How-To, below).

2. Two paper sacks, layered and tied with two-tone ribbon from M & J Trimming (How-To, below), could hold odd-shaped items.

3. Soaps nestle in a mini cardboard loaf pan by Novacart U.S.A. tied with twine. Print a tag, and tape to front.

4. Roll a candle in two pieces of crepe paper from Plum Party, and cinch ends with twine; a scallop-edged ribbon from M & J Trimming wraps the middle.

5. A box covered in wood-grain paper from New York Central Art Supply and satin ribbon from M & J Trimming is topped with hemlock cones, from Farm and Field, attached with adhesive dots.

6. Lenderink's veneer box is draped with a circle of cotton from B and J Fabrics cut 2 inches larger than the lid and held on with ribbon from the Store Across the Street.
Paper Sack Favor How-To

We started with two 6-by-3-inch paper bags in brown and white.
1. Using decorative craft scissors, trim 1/2 inch off the top of the white bag and 1 1/2 inches off the brown bag.


2. Slip the white bag inside the brown one. Insert wedding favor.


3. Close the tops of the bags together, and fold down 2 inches. With a mini hole punch, make 2 closely spaced perforations at the center, about 1/2 inch from the fold.


4. Starting at the back of the bag, thread the ends of a 20-inch-long double-face satin ribbon through the holes. Tie a bow at the front of the bag.


Easy Origami Wrap How-To

With a 6-inch-square piece of origami paper and a 4-inch-square box, no cutting is needed -- perfect when wrapping lots of wedding favors.


1. Place the lid, top down, on a sheet of overturned origami paper. Put an adhesive dot at the midpoint along each side of the paper.


2. Make sure the lid is centered, and carefully hold it in place with your hand as you work.


3. Fold 2 opposite sides of the paper inward over the rim of the lid -- make sure they're flat against the sides -- and press the adhesive dots to the inside walls of the lid.


4. On each of the remaining sides, fold corners in.


5. Fold remaining tabs over edges of lid; press adhesive dots to inside.


6. Fit paper-wrapped lid over box bottom.


Source: http://www.marthastewart.com/

Wednesday, June 23, 2010

Soothing Summer Body Spray Recipe

By Pioneer Thinking

Ingredients:

1 tablespoon witch hazel
1 teaspoon lemon essential/fragrance oil
1 teaspoon cucumber essential/fragrance oil
1 cup water

Directions:

For a refreshing cool feeling, make an after shower spray by combining all the ingredients. Place in a pump spray bottle.

Note: Don't use if you have sensitive skin, the lemon may irritate it.

Source: http://www.pioneerthinking.com/bodyspray.html

Tuesday, June 22, 2010

Article: Healthy, Natural Soap are all in the Recipe

On Sunday, March 27,2010 I found an article about natural soaps by Jennifer Forker (with Associated Press) in the Daily News.

The article features a couple of soap makers who turned their soap making hobby into a business including Emily Voth of Kansas, MO, who is the owner/operator of Indigo Wild. IndigoWild makes the famous "Zum Bar", other soaps, spritzes, scrubs and most recently home cleaning supplies has 13 full time and 40 part time employees.  Currently their Zum Bars are sold in 2,500 stores in the United States and a handful in other countries.

Included in the article is a cold process soap recipe from Lindsay Mann of Clean Getaway Soap Company  One of my favorite scents for soap is orange and I wanted to share it with you. What I found really interesting with this recipe is that the coconut and palm oils were melted by the lye water.  In classes that I  have taken, these oils were melted in a pot over a burner and then they were combined with the lye water at a particular temperature. And I have seen lye water made prior to the class and it is at a cooler temperature when it combined with the melted oils. I am wondering if this would be considered to be room temperature cold process soap making?  Does anyone know? I am not sure how that step really works and may have to give it a try sometime.

Orange Body Bar by Clean Get A Way Soap Company

Ingredients (4 pound batch)

7 5/8 ounces coconut oil (Coconut 76 was used by the creator)
3 5/8 ounces palm oil (not palm kernal)
5 3/8 ounces olive oil (Pomace was used by the creator but any olive oil will do)
6 ounces tap water (that's what the article said. Distilled water is better)
2 1/2 ounces lye
2 teaspoons orange essential oil
1 teaspoon annato powder, optional (This can be used for color.  If not available, tumeric can be used)

Supplies

Gloves
Apron
Protective goggles
Clean Spray bottle
Four bowls, such as pyrex, including one that can hold 8 oz.
Scale (for weighing ingredients)
Measuring spoons
Immersion blender
Ventilated cake rack
Soap mold
White vinegar (in case of lye spills)

Instructions:

(1) Put on protective gear:  long sleeve shirt and pants, apron, gloves and goggles. Fill spray bottle with full-strength while vinegar in case of lye spills.

(2) Weigh the coconut and palm oils, and combine then in a large, heat proof bowl.

(3) In three separate bowls, weigh the olive oil, water and lye.

(4) If using color, mix the annato powder (or tumeric) with 1 tablespoon olive oil and set aside.

(5) Make sure you have good ventilation (open windows, turn on fans).  Slowly add lye to the water, stir consistently until all the lye is dissolved.  NEVER ADD WATER TO LYE:  the lye solution will get very hot (above 212 degrees F).

(6) Add hot lye water solution to the coconut/palm oil mixture. The heat from the lye solution will melt the fat.  Cover to reduce heat loss, about 5 minutes.

(7) After the fats have melted, add the olive oil and blend with an immersion blender in 10-second bursts.  It will take about 2 minutes to reach "trace".  (Trace is a technical term referring to the point at which a little soap will dribble onto the surface of the mixture will remain there for a few seconds.  It's alittle thicker than shampoo, but not as thick as pudding.  Its at trace that most of the lye has been converted -- the best time to add "fragile" ingredients such as essential oils, color or oils that would otherwise be damaged by the lye.)

(8) After the trace has been reached, stir in orange essential oil and color-oil mixture.

(9) Pour soap mixture into prepared mold. Cover and insulate with an old towel or blanket.

(10) Allow soap mold to set for 24 to 48 hours.  Remove the mold, cut the soap into bars, and place them on a ventilated cake rack to cure (or age) for four to six weeks.

Tips:

* Orange Essential Oil is more stable and less costly than some other oils which makes it a great choice for beginners.

* For accuracy, use a lye calculator, such as the one available through Majestic Mountain Sage.

* Never substitute one oil for another in a recipe because different oils require different amounts of lye.

* Invest in an inexpensive immersion blender because stirring soap by hand takes a long time.

* It is important to weight the essential ingredients.

* Almost anything can be used as a soap mold.  If using wood, metal or glass molds, line with freezer paper.  For this recipe, the soap makers used a 4x8 white plastic drawer liner made by Rubbermaid.  Plastic does not need to be lined.  If you place your soap in the freezer for a few minutes before removing it from the mold, it will pop out easily.

Monday, June 21, 2010

Patriotic Swirl Soap Project from Michael's

Want to make this Patriotic Swirl Soap for the upcoming 4th of July holiday?  Then why not check out this project sheet from Michael's.
This would make a great holiday project for kid or adult at your holiday event.

Fish in a Bag Soap Project Instructions and Video

When I was a child, I remember going to the county fair and visiting the fairway with all of the games.  One that always stuck out was the game where you one a gold fish. 

Now the summer is here and the county and state fairs will soon be here, how you have the same memory and would like to recreate in soap here are the instructions from Go Planet Earth.  In addition you can find the complementary instructional video from the Martha Stewart Show.  So print out the instructions and follow along.

Tools and Materials

Clear plastic bag: 4 inches wide by 8 inches tall, and at least 1.5 millimeters thick
Clear glycerin soap
Heat-resistant measuring cup
Double-boiler or microwave
Rubbing alcohol
Small spray bottle
Plastic fish
Clothespin
Ribbon
Gift tag

Fish-in-a-Bag Soap How-To

1. Open the plastic bag and cuff the top enough so that the bag will stand on its own.

2. Place 4 ounces of solid clear glycerin soap in a heat-resistant measuring cup, and melt in a double-boiler or microwave.

3. Pour half the melted soap into the bag. Spray with alcohol until bubbles disappear. Allow to cool and harden for about 1 hour.

4. Re-melt remaining soap. Pour a small amount of melted soap on top of cooled soap in bag. Spray with alcohol. Position fish in melted soap, and let set 15 minutes to lock into place.

5. Pour the remaining soap over fish. Spray with alcohol. Gather bag above soap and pinch with clothespin. Allow soap to cool for 15 minutes.

6. Remove clothespin, and tie with a ribbon threaded with a gift tag.

Resources

Fish, bags, and soap can be purchased through Go Planet Earth
 
Source:  http://www.marthastewart.com/article/fish-in-a-bag-soap
 

Sunday, June 20, 2010

Rose Garden Bath Tea Recipe

Do you like the fragrant aroma of a rose garden, but you do not have the room in your backyard or you have a green thumb?  If you love to take a bath and would love to take an escape from your busy life , then why not create your own paradise Rose Garden Bath Tea recipe from Erica at The Bonnie Bath Company. This recipe has the combonation of Rose Petals, Calendula Petals, Lavender Buds, Chamomile Buds, Dead Sea Salts and Essential Oils (Bergamot, Geranium, Ylang Ylang, Lavender)

Saturday, June 19, 2010

Creamsickle Flavor Lip Balm with SPF

Recipe makes 6 ozs - All ingredients are weighed.

Ingredients:

1½ oz beeswax pearls
1 oz cocoa butter
1½ oz shea butter (natural)
2 ozs. avocado oil
1-2 teaspoons vanilla and orange flavor oil
1/4 - 1/2 teaspoon titanium dioxide white (micronized is recommended)
1 teaspoon vitamin E liquid (optional)

Directions:

In a very small pan, add the beeswax and melt over the lowest setting. Once melted add the cocoa butter chunks and shea butter, let melt and simmer 15-20 minutes, and then add the avocado oil. Heat through. Add the Vitamin E oil. Remove from stove and pour into a glass measuring cup for easy pouring into lip balm containers. Add the flavor oil, or if you would like to make more than one flavor with this recipe, separate into different glass jars or cups and then add the flavor oils. Adjust the amount of flavor oil accordingly. Stir in the titanium dioxide white and pour into lip balm containers. Some of the titanium dioxide will settle to the bottom, so work quickly and stir often. If the mixture starts to harden, place in the microwave for a few seconds to re-melt and then continue. If using lip balm tubes, top them off by filling a pipette with lip balm and dropping it to fill the tube.

Titanium Dioxide White is a white pigment and an opacifier and is widely used in the cosmetics industry. We've tested the recipe above to find it gives a good SPF factor. SPF also depends on how often a product is applied and reapplied. It also gave the lip balm a very creamy feel. Titanium Dioxide is not a chemical and less likely to irritate. Avocado oil, which was also used, is known for its natural SPF.

If you are wondering how PV Soap calculates their SPF ratos, here is a helpful link: http://www.pvsoap.com/SPF_chart.htm


Source: http://www.pvsoap.com/recipe_spf_lipbalm.htm

Friday, June 18, 2010

A Definition of French Milling Soap

Have you ever wondered what French Milled Soap was? Well, a customer question How do I French Mill Soap? came into the Wholesales Supplies Plus and Debbie May graciously supplied a detailed answer on her blog:

"Rebatching, or hand milling, is a soapmaking technique used by hobbyists and artisan soapmakers. The commercial equivalent is French milling.

In rebatching, previously made cold process soap is shredded or diced finely and mixed with a liquid, into which the soap shreds begin to dissolve. It is then heated at a fairly low temperature until the mass is more or less homogeneous. When it becomes translucent and reaches a thick, gel-like consistency, it is spooned or piped into molds and allowed to harden.

Soapmakers frequently use rebatching as a way of adding substances that could not withstand the high temperatures or caustic chemical environment of cold process or hot process soapmaking, such as certain essential oils (for example, those with a very low flash point). The choice of liquid affects the character of the finished soap; milk is frequently used to give the soap a smooth, creamy consistency. Rebatching can also be used as a way of salvaging soap that cracked, curdled or separated while being made. Triple milled soaps are often considered some of the finest true soaps in the market.

By definition of the process and creation of the "gel state", adding to a "liquid" and "rebatching", french milling cannot be physically accomplished with melt and pour soap. Calling melt and pour soap "french milled" is a deceptive marketing technique that I would not recommend.

Here are some of the comments that appeared on this post:

Anonymous said...If you grate the soap and add the liquid (milk) heat and stir until gel-like, then pour into molds, dry, then why isn't it french milled if you use M & P? Not trying to be argumentative, just curious because I have done it and added milk and botanicals and wonder why it wouldn't be considered french milled since that was the process. Nancy

Wholesale Supplies Plus.com said...French Milled refers to how soap was milled or re-batched in 19th century France. French Milled is a process. It cannot be done with melt and pour soap.To grate mp soap and melt it is no different than melting a big block. It does not hit the gel phase of soapmaking.I don’t take your comment as argumentative. I think there is confusion in the market that needs to be cleared up. It benefits all soapmakers to discuss this. Debbie

Sara said...how much liquid to soap ratio is recommended? i have a hp soap that crumbled on top. now i have lots of crumblies left over that i am not sure what to do with. this is a great option.

Wholesale Supplies Plus.com said... This is the method that I used years ago: 4# Shredded CP Soap (cured no more than 5 days)3 cups MilkPlace shredded 4 pounds shredded soap and 2 cups milk in crock pot. (Recipe works best if pot is completely full). Set temperature at 150ยบ-200ยบF. Cover and allow to cook for 1 hour. After 1 hour, remove the lid and gently stir. If you can still see soap shreds, cover and allow to cook further. Every 15 minutes check on soap to see if shreds have melted. The soap will look like runny mashed potatoes. The maximum cook time is 3 hours. Remove from heat and add 1 cup of milk. Add 2 ounces of fragrance (if not added to original shredded soap) and color as desired. Stir until fully blended. Spoon mixture into molds. Allow soap to become hard and unmold. Allow to cure 3-4 weeks .Notes: The more fluid you add to the recipe, the more shrinkage you will experience with the final bar. Debbie "

So, if you were wondering what French Milled Soap I hope that helps. I have heard of this type of soapmaking, but I never have tried making soap this way. I was more familiar with the term handmilled and was not sure if there was a difference between the two. Now I know. Thanks Debbie for clearing that up.

Source: http://blog.wholesalesuppliesplus.com/search?q=french+milled+soap

Thursday, June 17, 2010

Watermelon Soap Tutorial

Looking for a fun summer soap project? Here is a recipe from Amy from Great Cake Soap Works that appears on The Bonnie Bath Company's site.

This soap is made using the cold-process method on an intermediate level. It requires that you have a soap recipe (water at about 28% of oil weight) and the know-how to use SoapCalc, It takes three days to make all the layers and get it ready to cut and cure.

Equipment needed

Plastic pitchers for lye solution
Stainless steel soap pot
Mixing bowls
Mixing spoons
Ladle (optional)
Electric stick blender
lined log mold – holds 4 lb. of soap
small (disposable) plastic container – holds at least 2 cups
bamboo skewer

Ingredients list

Your regular cold-process soap recipe ingredients
Glycerin (optional)
Black oxide
Chromium green oxide
Titanium dioxide
Red soap dye – red 40
Watermelon fragrance from Oregon Trails
Day One

Make black soap for seeds: Figure out your normal soap recipe using a total of 8 oz. of oils and water at 28% of oil weight. (This is done most easily by plugging your numbers into SoapCalc.) Add 0.25 oz. of watermelon fragrance and about 1/8 tsp. of black oxide mixed in about a teaspoon of glycerin, if you have it (works best if you let it sit overnight). Otherwise you can mix the black oxide with a little bit of reserved oil from your soap. Pour into a small disposable plastic container.

Make green rind: Make another small batch of soap, this time using 6 oz. of oils. Add a pinch of chromium green oxide mixed in a small amount of glycerin to the entire batch. Take out about half of the soap and add another pinch or two of chromium green and black oxide for a darker green. Pour thin strips of alternating colors in the bottom of the log mold at light trace. Take the bamboo skewer and skwiggle it back and forth across the darker green stripes. Cover lightly over the top of the mold with some plastic wrap (doesn’t need to touch the soap).

Day Two, AM

Make a layer of white rind: Mix up another small batch of soap using 6 oz. of oils. Add ½ tsp. of titanium dioxide and 0.25 oz. of watermelon fragrance. I used a toothpick to make a bunch of small holes in the green rind to help the layers stick together. May not have been necessary. Pour white soap over green rind at light trace.

Next, it’s time to melt the oils & butters for the main pink part of the soap, and get your water ready in the refrigerator. Figure up your soap recipe with 30 oz. of oils for the pink part.

Day Two, PM

Time to chunk up the black soap, and start making the pink soap. Add 1 tsp. titanium dioxide and a pinch or two of red soap dye (mine is a powdered red 40), plus 1.25 oz. of watermelon fragrance to make the pink soap. Stir in the “seeds” at light trace, right before the pink soap is ready to pour into the mold. After pouring, I covered the top of the soap with plastic wrap and wrapped it in towels to set overnight.

Day Three

Cut the soap and marvel at your beautiful creation!!!!

Now you can't hate Amy for making mouth-watering delights, with perfect swirls and yummy scents. You just can't hate a person for sheer talent when they are so stinking nice and gave you instructions for an awesome bar of soap. In fact, I assure you, you will like her very much. Be sure to follow her blog and fan her on facebook.

Where can you find Amy and Great Cake Soapworks? Follow any of the links below.

Website: http://www.greatcakessoapworks.com/

Blog: Great Cakes Soapworks Blog (Soaping info and free tutorials are listed here)

Facebook: http://www.facebook.com/greatcakessoapworks

Twitter: http://twitter.com/greatcakesoap

Wednesday, June 16, 2010

Debbie May's Lemon Sugar Soap

This soap recipe from Wholesale Supplies Plus just reminds me of summertime and lemonade. 

Project Level: Beginner
Estimated Time: 1 Hour
Yields: Approx. (16) 4 oz Bars of Soap

Ingredients

• 2 Pound(s) Crafter's Choice Ultra White Soap Base
• 2 Pound(s) Crafter's Choice Extra Clear Soap Base
• 2 Ounce(s) Crafter's Choice Lemon Sugar Fragrance Oil
• 1 Crafter's Choice Yellow Soap Color Bar
• 2 Ounce(s) Crafter's Choice Vanilla Color Stabilizer
• 16 Crafter's Choice Rectangle Clamshells

Equipment

• Droppers - Plastic
• Gloves
• Microwave
• Pyrex or Microwave Safe Cup (16 - 32 oz)
• Rubbing Alcohol with Fine Mist Sprayer
• Soap Slicer/Cutter
• Spoon

Directions

Using a soap slicer, cut clear soap into 1-2 inch pieces. The soap slicer is dull and perfect for this project. Do not use a knife as it is very sharp and the soap is slippery. The knife could slip causing injury.

Place 8 oz of clear soap in a microwave and heat for 30 seconds. Stir well. Repeat until soap is completely melted.

Cut a small piece of yellow color from the color bar. Place into soap and stir. The color bar will melt as you are stirring. Depending on your preference, you can add more color.

Set the small cup on a flat surface. Using a dropper add 7 ml's of fragrance oil to the cup and add 7 ml's of vanilla color stabilizer to the cup. Stir thoroughly.

Immediately pour the yellow soap into a clamshell until it is 1/2 full. The 8 ounces of soap you are working with should fill 4 clamshells 1/2 full.

Using a soap cutter, carefully cut white soap into 1" cubes.

When colored clear soap has cooled to 130ยบF, hold the soap cubes in your hand and apply a spray of rubbing alcohol. Be generous! It is the rubbing alcohol that allows the white and clear soap to adhere to each other.

Place cubes of soap into bar. Add enough cubes so that bar is completely full.

Spritz top of soap with rubbing alcohol. (This will pop bubbles and give a smooth surface to the soap)

Allow soap to naturally re-harden. Apply clamshell lid.

If you are sellling your soap, don't forget to label the soap to complete the package. Label according to FDA cosmetic label guidelines.


Source: http://wholesalesuppliesplus.com/RecipeDetail.aspx?RecipeID=46

Tuesday, June 15, 2010

What is a Loofah?

The first time I saw a loofah was in a bath shop and it was used for using in the bath or shower to exfoliate your skin. Now it is popping up in melt and pour soaps and other products.  I wanted to learn more about loofahs and I found this explaination on "eek.com:

"Loofah is a climbing vine related to gourds and cucumbers, and sometimes called the “dishrag vine,” a reference to the sponge-like qualities of the dried fruit. Six species are in the Luffa genus, and they are widely cultivated for food and sponge uses. The loofah is the only plant source of sponge, and it has been used in bathhouses and kitchens for centuries. Traditionally cultivated in India and the Middle East, where the name originates, loofah is also grown in other warm, dry regions.

In appearance, a loofah looks like a cucumber. The attractive trailing vines of the plant will take over any available surface, yielding drooping green fruit in the summer. Loofah vines are often used to cover decaying fences or as privacy foliage, because they are dense and fast growing. Loofah prefers warm, dry climates, and is very sensitive to frost, generally not thriving outside of USDA Zone 10 unless gardeners sprout indoors and keep a close eye on their young loofah plants. The plants need to be watered regularly, but should not be allowed to become waterlogged.

Loofah is harvested for food in many parts of Asia. All species of loofah are edible, but they must be consumed before they mature, or they will be too woody and fibrous to eat. Loofah is cooked before eating, and is sometimes seen on menus as “Chinese okra.” When allowed to mature and dry on the vine, loofah can be harvested as a sponge. The woody exterior skin is peeled away, and the seeds shaken out for reseeding. The loofah sponge can be sold whole, or chopped into smaller and more manageable portions. Loofah can also be compressed for shipping. The net of straw colored fibers will puff up again if the loofah is moistened.

Like other sponges, loofah will collect bacteria if it is kept moist and warm, an environment common to bathrooms. For this reason, many people incorporating loofah into their beauty regimen prefer to use it as a dry exfoliating brush before bathing, or to grind it and use it in exfoliating scrubs. As a dry brush, loofah will gently remove the surface layer of dead skin, leaving the skin smooth and conditioned. Loofah can be used as a body sponge in the shower, but it should be allowed to dry out between uses. In the kitchen, loofah makes a great abrasive sponge for removing stubborn food particles from dishes and counter tops. Loofah is also gentle enough to use on delicate things like coated cookware which cannot withstand normal abrasives."


Source: http://www.wisegeek.com/what-is-a-loofah.htm

Monday, June 14, 2010

Melt and Pour Soap Recipes - Cookie Cutter Soaps

Ingredients

Melt and Pour soap base(opaque)
Scent (optional)
Color (must be liquid, like gels)
cookie sheet (must have at least a 1/2 in. edge on it)
knife (to swirl your colors)
cookie cutters

Directions

Melt down the soap base and scent. You can give the main base a color if you wish or leave it white. Pour the base on the cookie sheet and add colors and swirl them all over - be creative! When this dries, pop the block of soap out of the cookie sheet. Use cookie cutters to cut up the soap. There are lots of different things you can do with this. Some ideas:

Christmas Soap: Swirl red & green into white and use cookie cutters

Candy Cane Soap: Swirl red into white with peppermint scent and candy cane cutters

Easter/Spring: Swirl multiple pastels and find some fun cookie cutters

4th of July: Patriotic white soap with a beautiful red & blue swirl (find a nice star cutter!)

Sunday, June 13, 2010

In the mold hot process soap tutorial

In the mold hot process soap is a variation of hot process soap. In making a typical hot process soap the oil and lye are combined, mixed till trace and then cooked on the stove or in the oven until thick and slushy-like, then combined with additives, fragrances, essential oils and the like. The last step to the usual hot process method is to place it in the mold and let it cool. At the end of 24 hrs or so the soap is ready to use and cut into useable pieces. In contrast, in the mold hot process soap or ITMHP is soap that is cooked (baked) in a mold in the oven.

In this way this method mimics the cold process method without the weeks of waiting for the soap to cure and be free from lye. Another benefit of this type of method is that the soap has a smoother, less grainy texture than soap that is cooked on top of the stove or cooked in the oven and then poured into a mold.

Why use In the Mold Hot Process method? Well, if you like cold process soap but do not like waiting for weeks for the soap the cure and be free from lye, then this method is right for you. In a mere 24-48 hours the soap will be ready and though this way to make soap sounds a lot like regular hot process in the oven soap, yet the advantages to this method is that the soap has a much more refined and smoother appearance. All in all, this method to making soap is preferred by folks who just don’t like waiting for soap to cure or soap that has a primitive and lumpy appearance like regular hot process soap.

Most recipes for cold process soaps can be adjusted for this method. Below are some important points to consider before making in the mold hot process soap:

1. The mold has to be sturdy enough to withstand the constant heat of the oven without conducting too much heat. Thus, I advise using a mold that is 100% wood, not particle board or plywood. Inspect the joints to make sure they do not have glue that will come apart under the heat of the oven. Check with the manufacturer also to make sure that any glue used will not give off any toxic fumes such as formaldehyde, which is present in some wood substitute products.

2. The ingredients used and especially fragrances and essential oils will need to be ones with flashpoints that are higher than the temperature of the oven. The typical oven temperature for this method is anywhere from 175-180 Degrees Fahrenheit.

3. The oven has to be protected from any seepage from the mixture by lining it with tinfoil or placing a baking sheet under the mold.

4. Keeping the temperature under 200 degrees is very important. What we are trying to do is mimic the saponification process of cold process soap. The difference here is that we are extending this process a bit by cooking it for 2 hours and then leaving it in the warmed oven another 12 or more hours to set. Typically, cold process soap heats up and saponifies at temperatures between 175 - 190 Degrees Fahrenheit. At the end of which there is some left over in the soap so that it has to be cured for 3-6 weeks to get rid of that lye.

Directions

***Most regular cold process soap recipes can be finished in this method.

For full directions for making cold process soap see article How To Make Cold Process Soap Follow directions 1-9, then follow directions for In The Mold Hot Process Soap listed below:

As in making cold process soap, combine the lye and oils and mix with a sturdy wire whisk or stick blender till it reaches trace. Next, pour the traced soap into a sturdy, lined wooden mold or one deemed safe by a mold manufacturer for oven use. I like to use sturdy plastic for lining the mold going into the oven.

Cut the plastic lining for mold large enough so that there is extra to fold and cover the soap to prevent it from drying out snd forming s crust. Place the covered soap in a preheated oven 175-190 Degrees Fahrenheit for 2 hour, after which you turn off the oven and leave the soap in the oven for another 12 hours or more to solidify. The soap is ready to cut once it is firm enough to cut.

Test a piece of soap before using for lye. I like to break a piece off and use it to wash my hands.

If there is no tingling, the soap is fine to use. If there is tingling, slice soap into bars and leave to cure in a cool location for 3-4 weeks. At the end of which it is adviseable to test for lye.

Tongue test for lye

Some folks use the tongue test to test if the soap is ready to use. I do not use this method because to me the soap tastes horrible and I cannot distinguish the awful taste of the soap from the sting of lye if it is present! So to do the tomgue test, break off a piece of soap and taste it with the tip of your tonge. if it burns, thenthere is lye in the soap. If the taste is just awful without the burning, then there is no lye present and you can test the soap further by using a small piece to wash your hands.

Reprinted with permission from Winsome Tapper, Soapmaking Editor,www.Bellaonline.com/site/soapmaking

Source: http://www.bellaonline.com/articles/art10361.asp

Saturday, June 12, 2010

Candy Cane Soap (Soapylove)

Lori Nova graciously posted this picture (on Twitter) of the candy cane soap made in SoapyLove's class at The Nova Studio on December 12, 2009.

For those who missed her Soapy Holidays Gift Workshop: 5 Fun & Festive Melt & Pour Soap Projects ~ with Debbie Chialtas ~ last year, Debbie will be offerring her class on December 5, 2010 from 10 am - 5 pm at The Nova Studio.  Sign up early because Debbie's classes sign up quickly. 

You may also want to sign up for Debbie's SoapyLove "Book" Camp: Melt & Pour Soap Weekend Intensive.  This book camp will cover alot of the projects from her book.

Vegan Solid Lotion Bar Recipe


Ingredients:

2 ounces Candellia wax
1.5 ounce Almond Oil
1 ounce Olive oil
1 ounce Cocoa Butter
1 tsp Vitamin E
Fragrance (by the drop, until it is the scent you want)

Directions:

(1) Melt first 4 ingredients together on low heat.

(2) When fully melted remove from heat and add Vitamin E and fragrance. Pour into tubes or molds.

(3) Then add your fragrance and/or coloring. Pour into your deodorant tubes and let set up completely.

If you are looking for other recipes, check out some of the links in the side bar or check in my archive. There are alot of recipes in both places. I am always looking for new recipes to post on my blog, so please return in the future.


Source: http://www.soapcrafters.com/recipes_lotionbar_vegan.htm

Friday, June 11, 2010

Lip-Smackingly Delicious Summer Lip Gloss

Summer is just around the corner.  And what reminds me of summer?  Watermelon!  Here is a recipe for a Lip-Smackingly Delicious Summer Lip Gloss from All Things Hold Together that is perfect for the summer season.

What is interesting in this recipe is the ingredient of coconut oil.  I have not seen a recipe that uses this ingredient so I am interested in trying it.  Have any of you tried it?  What do you think?

Thursday, June 10, 2010

Creating Catalogs – How To Get Started

If you currently have a business and you are looking to expand your marketing materials to sell your bath and body products but you do not know where to begin. Well, here is an article from Handmade Marketing
on how to one marketing tool and that is Creating Catalogs – How To Get Started.

Wednesday, June 9, 2010

Gardener's Handscrub

Spring is here and even though in some parts of the country we are still getting rain.  But that does not mean the gardening is going by the wayside!  Are you are a gardener or know someone who is? And you simplying cannot get your hands clean after working in the garden? Well you may want to try and make this simple recipe for Gardener's Hand Scrub Recipe from House on the Hill Road. This would would make a great gift for anyone who you know who is the gardener in the family. So why not give it a try today!

Tuesday, June 8, 2010

Lip Balm - Pina Colada Twist

Is Pina Colada your favorite tropical drink? Or do you want to be reminded of your trip to the Carribbean?  Then why not make this Pina Colada Twist recipe from Craftbits. This recipes makes 3-4 small pots of balm. If you want to put this recipe in a tube it may make more so be prepared.

Materials:

6 tsp jojoba oil
1 tsp aloe vera oil
3 tsp of beeswax
5 drops pineapple flavor Oil
5 drops of coconut flavor Oil
3 drops of rum flavor Oil

Instructions:

Melt the oils and beeswax in a double boiler (pan over a pan of water) on a low heat until the wax is melted. Remove it from the heat and while the mix is still hot add any remaining ingredients such as essential oils or your optional coloring.

Mix all the ingredients together well and while hot pour into suitable pots or containers. Allow to set before use.

Insure all containers are sterile by boiling them to prevent contamination of your lip loss.

If you wish to dye this balm you can use a cosmetic coloring available from home made body product supply stores. You can also use a small amount of store bought lipstick to tint the balm.

Alternatively you can also use colored beeswax or candle dye as it is being used in such a small quantity it will not stain or harm your skin.

Source: http://www.craftbits.com/project/lip-balm-pina-colada-twist

Monday, June 7, 2010

How to Make Carnation & White Wine Bath Water

Have your heard of Bath Water? This is a first for me. If you would like to try and make your own bath water, here is an interesting recipe by Amy Rose from Ehow on how to make a healing white wine carnation bath water.  This would be a great gift to make for your friends as favors for a bridal shower, etc.

How to Make Carnation & White Wine Bath Water

Sunday, June 6, 2010

Stars and Stripes Soap #2


For this patriotic bar of soap you will need:

a rectangular bar mold (or other desired shape)
white melt and pour base

red and blue colorants (be sure to use non-bleeding)

a small star-shaped cookie cutter (make sure it fits in your mold)

summery fragrance of your choice

alcohol in a spray bottle
You will also need equipment to melt and mix your soap. Most people use a Pyrex measuring cup and microwave. I use a small slow cooker to melt my soap and mix the colors in small dishes. You can also use a double-boiler or a bowl set atop a pan of simmering water.
* Each layer should be fragranced. I melt my entire base together and add the fragrance.
* Color enough melted and scented base for the first layer blue.
* Pour it into your mold and spritz with alcohol to remove any air bubbles.
* When it is firm, use your cookie cutter to cut a star out.
* I had a little trouble getting the star out because the layer was still very soft.Spritz the blue layer with alcohol and immediately pour the melted and scented white base over the blue layer to desired height. Remember, you need to leave space for the remaining layers.
* Spritz again with alcohol to remove air bubbles.
* Color enough base for the next layer red.
* When the white base is firm, spay with alcohol and pour over with the red colored and scented base.
* Spray again with alcohol to remove any air bubbles.
* When red layer is firm, spay with alcohol and pour the final white layer to the top of the mold. Spray with a final spritz of alcohol to remove air bubbles.
* Wait until all layers have fully hardened. This takes a few hours. Alternately, you can let it harden over night.
* Turn over mold and gently press to remove your American flag-inspired soap.

Saturday, June 5, 2010

Patriotic Solid Bath Sugar Cubes Tutorial

These single use 4th of July bath sugar cubes recipe are from Erin Pikor owner of Naiad Soap Arts and appear on the blog Soap and the Finer Things.

These festive solid sugar scrubs are easy to make and are perfect combonation of cleansing glycerin soap with exfoliating sugar to make perfect single use solid sugar scrubs! You can make these any time of year and the colors can be changed to suit the season or your decor.   Or be wild and change them to your favorite color.

If you would like  this recipe and would like to learn more about Sugar Scrubs from Erin, she will be teaching a class, Simply Sweet Sugar Scrubs at The Nova Studio in Point Richmond, CA on September 12, 2010.

Friday, June 4, 2010

How to Make a Chunk Candle

I recently got back into making candles.  And my search for new ideas I found these instructions on how to make a chunk candle by SDKP, eHow Member.  I always thought chunk candles as just chunks, not shapes.  The author really did well incorporating the moon shape and dividing the candle down the middle with the two different colors.  It really makes a statement. I am going to try this technique really soon. And over the years I have purchased a variety of cookie cutters to make soap embedds, now I  have another use for them.

If you would like to see how the author created this candle, check out her article, How to Mak a Chunk Candle.

Thursday, June 3, 2010

DIY Episode #7- Whipped Body Butter

Have you purchased a whipped body butter in a retail establishment and wondering how you can recreate your own? Then take a look at this clip on how to make your own and save a ton a money. This recipe would definately would be a great gift to make for someone or do as a project for a bridal or baby shower.

Wednesday, June 2, 2010

Copyrights, Patents & Trademarks for Selling at Craft Shows

Copyrights, are common concerns for craftspeople. If you've invented a unique product, you will more than likely want to protect it from others who can create knock-offs of your craft show gem at cheaper prices. Although it may be flattering to have created a craft item others want to duplicate, it can also be a nightmare to see your distinctive creation on the Home Shopping Network! The United States Patent and Trademark
Organization Web site (http://www.uspto.gov/)  is a good place to learn the differences between trademarks and patents and to learn what is best for your situation. For more information and to apply for a copyright go to http://www.copyright.gov/.

Although attorneys may be costly, some offer free 30-minute consultations, so you may be able to find one who can tell you what's the best protection for your craft show product. If you find the costs are prohibitive for you to secure a trademark, patent or whatever you find you need, you'll just have to take your chances without one. Again, check with other crafters through shows and forums, as well as your craft organizations to find out what they've done to protect their crafts. Those who have come before you can ease your way so you don't have to reinvent the wheel.

Your Copyright

"A copyright is a form of protection provided to the authors of 'original works of authorship' including literary, dramatic, musical, artistic, and certain other intellectual works, both published and unpublished. The 1976 Copyright Act generally gives the owner of copyright the exclusive right to reproduce the copyrighted work, to prepare derivative works, to distribute copies or phonorecords of the copyrighted work, to perform the copyrighted work publicly, or to display the copyrighted work publicly. This includes your craft show products.

The copyright protects the form of expression rather than the subject matter of the writing. For example, a description of a machine could be copyrighted, but this would only prevent others from copying the description; it would not prevent others from writing a description of their own or from making and using the machine. Copyrights are registered by the Copyright Office of the Library of Congress." (http://www.copyright.gov/)

Most people think of copyrights for books or music and not creative arts like paintings or crafts, but a copyright can protect all forms of creative expression and visual arts. Visual arts are defined as original pictorial, graphic and sculptural works, which include two-dimensional and three-dimensional works
of fine, graphic and applied art. Some examples are:

Artificial flowers and plants Artwork applied to clothing or to other useful articles Collages Dolls, toys

Drawings, paintings,murals Enamel works Greeting cards, postcards, stationery

Jewelry designs Mosaics Needlework and craft kits

Original prints, such as engravings, etchings, serigraphs, silk screen prints, woodblock prints

Patterns for sewing, knitting, crochet, needlework

Reproductions, such as lithographs, collotypes

Sculpture, such as carvings, ceramics, figurines, molds, relief sculptures

Stained glass designs

Stencils, cut-outs

Weaving designs, lace designs, tapestries

A copyright gives the creator of the product exclusive rights to produce, sell and distribute the item. When your work is created, it is automatically copyrighted, however, for optimum protection, it's best to apply for a copyright. When obtained, you can add the copyright symbol (c) on all your materials.

Copyright your designs, so you have legal proof in case someone copies your work. A copyright does not automatically keep someone from stealing your designs—you'd have to find the culprit and enforce your rights, which may not be a simple matter and will require an attorney. Having the copyright, however, may deter someone from copying you, so at least that's a good place to start—and it only costs $30 per copyright!

About the Author

Natalie Goyette shows you how to make your craft show business profitable in her best selling ebook: Craft Show Success Secrets. Visit her site: http://www.craftshowsuccess.com/

Source: ArticleTrader.com

Why Write an EBook Vs A Published Book?

Are you knowlegable in a particular subject that readers would be interested in? And have you been interested in writing a book?  Did you think that the process was too long?  Here is an article by Charlon Bobo titled "Why Write an EBook Vs A Published Book?" which appears on Ezinearticles.com explains why. 

If you would like to follow Charlon, she has a blog EditCopyproof. And check out more interesting articles on Ezinarticles.com.

Tuesday, June 1, 2010

What is Mineral Oil?

I have heard of mineral oil in body products and using it to condition butcher block surfaces, but I was wondering how it was used in other ways. I found this description on Wisegeek.com:

"Mineral oil is one of a number of inexpensive byproducts that are made from petroleum. Sometimes referred to as paraffin oil or Nujol, white mineral oil is composed of a blend of hydrocarbons that is not unlike that of petroleum jelly. The difference is that mineral oil is a liquid petrolatum, making it an ideal choice for a number of applications. Here are some of the more common uses for mineral oil around the home.

Perhaps the single most common use for white mineral oil is to remove makeup at the end of the day. Mineral oil has the ability to cut through the minute amounts of grease and dirt that tend to cling to makeup over the course of the day, making it possible to strip off the layer of makeup easy and prepare the face for cleansing. Along with removing makeup from the face, mineral oil is often used as a beauty treatment, as it is an excellent amplifier that helps the body to absorb ultraviolet rays without drying out the skin. While not everyone is aware, baby oil is simply mineral oil that has been enhanced with a small amount of fragrance.

Mineral oil is also good for use in the kitchen as well. Butcher-block surfaces can be conditioned with the substance from time to time. Treatments of mineral oil help the wood to stay supple, and also help to soften the appearance of nicks and cuts that are made during regular use of the block. Soapstone countertops can also benefit from an application of mineral oil from time to time. The properties of the oil help to keep the surface looking new, even if the countertop has been in place for ten years or more.

Clay is another medium that can benefit from the application of mineral oil from time to time. For example, treating new clay pots with mineral oil will help to age the look of the pot. This is often desirable with decorating schemes that tend toward old country or shabby chic motifs. Clay poker chips can also be aged with the application of a little mineral oil, helping them to look well loved and used.

Mineral oil is a very inexpensive item to keep around the house. With so many different types of uses, having a bottle of mineral oil in the cupboard is an excellent idea. Whether for personal hygiene or maintaining the look and condition of selected items around the home, mineral oil is a great option."